Are You Ready To Learn How To Build A SEO Friendly Blog In 15 Minutes (Or Less) And Write Your First Blog Post? Then I’m Here To Guide You One Step At A Time…
As an entrepreneur one of the most critical pieces of your success online will be building a website that has long-term success in the search engines. Consider what happens when someone searches for a solution to a specific problem online. They type in a few keywords in a search box and waits to see what results are returned. When they see what looks to be like content that will solve their problem (usually in the first 5 results they see), they click the link and go read the content. That is what is called highly qualified organic traffic. Many small business owners believe that getting good rankings involves some sort of complicated series of SEO steps, but trust me when I tell you that in today’s post Panda/Penguin world, it isn’t that difficult. You just need to know what to do and when you do you can get it done rather quickly.
In this post today (this is a long article but worth the read:), I have outlined the steps that you can take to create a really SEO friendly blog as well as write your first post and you can do it all in under fifteen minutes.
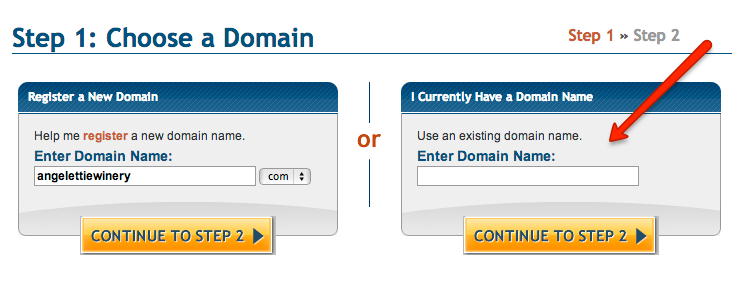
STEP 1 – Selecting A Good Great Domain Name
It use to be that SEO experts and marketers taught clients that it’s better if you pick a domain name that has your top keyword phrase in it. We did so because for years that’s what Google showed us and told us they liked. Domain names with keywords in them because it showed relevancy. Yet with recent updates affecting exact domain names as well as Google’s Panda and Penguin updates, now everything we know has been turned upside down.
So the advice now is to not go with a domain name with an EXACT match to your keyword phrase; but to purchase one with your keyword inside. So for example, if you sell blue shoes on your site, do not buy a domain name such as Blueshoes.com — what you could buy though instead is LisasBlueShoes.com or PhiladelphiaBlueShoes.com which is not an exact keyword match but still contains the relevant keyword of blue shoes.
You can also go with a brand name (such as LisaAngelettie.com) and forget about selecting a keyword rich domain name, yet focus your SEO optimization in other ways, which we will go over in step four of this tutorial.
TIP: You will buy a domain name once and renew it annually with any company you buy it from. Most companies charge between $10 to 15 dollars per name and the same for renewals. It is best to buy a .com name as it is the most widely recognized and used. In a pinch, you could go with a .net or a .org. Do not waste your money on a .info name or a .biz. I have yet to see these do well in the search engines.
RESOURCE: Whichever type of name you decide on, using this link you can purchase one for only $5.99 with my preferred domain hosting company GoDaddy.
STEP 2 – Fast & Reliable Website Hosting
Many moons ago, I once founded and ran an article directory for coaches. It was really becoming a great niche resource in my industry until I started running into major problems with my website hosting company. They were constantly shutting me down because of the amount of resources I was using because my traffic was good, submissions were high, and the platform that the directory was built on used a lot of resources. At the time this host didn’t have any other options for me. Shared web hosting which is fine for most sites, was all they provided and I needed something a little more robust.
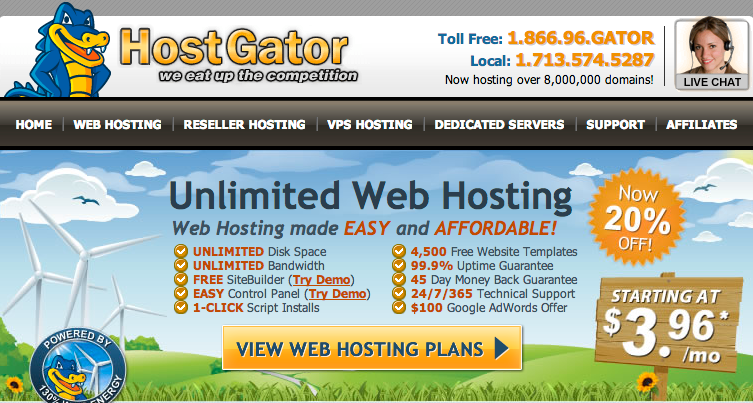
I went searching for a new webhost and found Hostgator. Someone recommended them as a host who had experience handling resource heavy sites like my own under a completely affordable shared hosting plan. No need for my own server and the cost of that and they were right. I’ve been with them ever since.
One of the major factors that the search engines have been warning webmasters about for months is that page load time and site speed matters when it comes to ranking our content favorably. If it’s between sites that have near identical content but one site is faster than the other, the faster one will be ranked higher. While there are many factors that affect site speed, one of the major ones is using a webhost that is reliable, secure, and speedy.
SIDE NOTE: You can also buy your domain name with Hostgator which will cost a little more at $15.00, but I like to keep my domain name registrations separate from my web hosting just in case one of them goes down. If that happens (and I have stories about that!), I can always switch the name to a new host or move a new name to my hosted site. If you purchase your domain name with a separate company such as GoDaddy, then you will need to create your new account using your existing domain name.
TIP: You will need a web hosting company to host your blog. Think of it as “office space” for your blog. Free WordPress hosting will not work for a for-profit company because of their terms of service which they fully execute. You will pay for your web hosting on a monthly or annual basis and packages are rock bottom cheap now (not like when I first started out:). Make sure to write down or record your username and password after you open your account and keep it in a safe place. I use 1password for my password management.
RESOURCE: You can get started with Hostgator webhosting for as little as $3 bucks a month (at the time of this writing) and you can save $9.94 on your entire package only when you use my affiliate link and special coupon code: CONTENTRICH
STEP 3 – Installing WordPress
Once you’ve purchased your web hosting plan, it’s super simple to install your own self hosted WordPress blog. First, you’re going to log into your new web hosting’s account CPANEL area. So for instance, you’d go to the url: http://YourWebsite.com/cpanel, which will lead you to a login box. Add the USERNAME and PASSWORD you used when you created your web hosting account. (I told you to write it down earlier:)
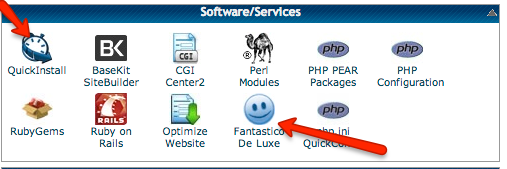
Now you are logged into your cpanel administration area. You can and you should spend a little time playing around in your cpanel area at a later date and get familiar with it. For now, I’m going to have you scroll down and find the links for QuickInstall or Fantastico De Luxe under software/services. This is the program that you are going to use to install your blog. If you see QuickInstall, go with that one.
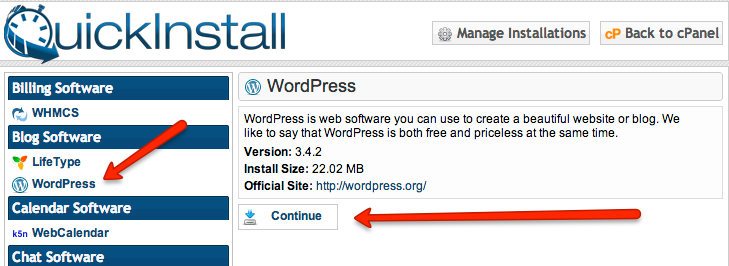
Once you’ve clicked on QuickInstall, then you will look to the list of software programs on the left and click on WORDPRESS. You’ll see information to the right describing the version and installation size of WordPress and a button to click to continue installing the software.
Once you click continue, you’ll see another box appear on the right hand side where you will input some required information for your new blog. The first thing you’ll see is a drop down menu with your domain name in it. It’s here where you decide if you want your blog to be hosted at the root meaning http://yoursite.com or on a separate directory such as http://yoursite.com/blog. If you want it hosted on a separate directory, then you’ll have to write the name of it in the box next to the drop down menu. For example: blog. You need to be sort of sure how you want to do this because to change it you would have to uninstall WordPress then start all over again.
Examples of both scenarios would look like this:
Hosted at the root: http://LisaAngelettieBlog.com [You see blog posts on the first page of my site because it’s hosted at the root]
Hosted on a separate directory: http://clickbank.com/blog
Add an administration email for your blog, your blog’s title, your first and last name (you can change any of these details later) and click INSTALL NOW. Let the magic happen:) You’ll see a progression bar and after installation you’ll see notification of its completion. Congrats!
STEP 4 – Optimizing WordPress
Now it’s time to login to your new WordPress blog. Now you’ll go to your WordPress admin area by going to the url: http://YourSite.com/wp-admin. Once there you will need to input your username and password. Before we start writing your first post, we need to tweak some things to make your blog super SEO friendly.
There are two shortcuts to optimizing your WordPress blog. You can either use a plugin such as the wildly popular WordPress SEO Plugin, or you can use a premium template to do the job such as Thesis, or a combination of both. (I use a combination.) Whichever solution you choose, these are the basics you’ll start with when setting up your site:
Site Visibility – Make sure that you’ve published your blog to the public. You’ll find the option in the privacy area under SETTINGS in your WordPress dashboard. Believe it or not a lot of people forget or don’t know to do this after setting up their blog.
With the WordPress SEO plugin and Thesis Template you can set up these other three items:
Titles & Meta – Set your title & meta information for your blog the way you want people to see it in a search.
Permalinks – Change your permalink settings to a more SEO friendly one such as /%postname%/.
Sitemaps – Set up a XML sitemap so that search engines can easily crawl every post and page on your site.
RESOURCES: I highly recommend to invest in the Thesis WordPress Template and to download the FREE WordPress SEO plugin by Yoast.
STEP 5 – Writing Your First Post
Whew! You’ve set up and optimized your blog. Now it’s time to write your first post. WordPress is really simple to use. Go to the POSTS link and click on ADD NEW. Give your post a reader friendly title that includes a relevant keyword. WordPress will automatically use that title as the url for the post, but you can edit the url in case it’s too long. (I do this all the time).
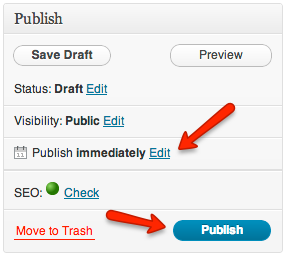
When writing for the first time, sometimes it’s a good idea to write an introductory post which explains who you are and the types of content you’ll be writing about in the future on your blog. Some people just dive in with a really meaty, info-packed post. The choice is yours. Tweak your SEO settings for your post and then publish your post immediately or schedule it to post at a later date.
Thank you for taking the time to read this tutorial. I will be posting a series of supporting mini posts for this tutorial to take your blog publishing and optimization efforts to the next level, so be sure to subscribe to get notification of them or follow me on Facebook, Twitter, or Google+.
Please leave any questions or feedback you have on this tutorial in the comment section and be sure to share this post with someone you think would benefit from it.

