How To Add Your Custom Header With Thesis Openhook Plugin In 60 Seconds!
This is an important post. I repeat. This is an important post. If you are about to build a WordPress Blog and are thinking of using the Thesis WordPress Theme as your framework, you can save yourself tons of customization frustration if you download the Openhook WordPress Plugin before you begin customizing your site. Why? Because it makes things so much easier. For example…
If you do a quick Google search on adding a custom Thesis header, you will find several tutorials by loyal Thesis users (such as myself:), teaching you how to customize your header by adding hook code either your custom.css file or your custom_functions file. These solutions still work but they can be messy if you don’t get the code right and you have to access those files via FTP or cPanel etc.
Instead, you can add a custom header with the Thesis Openhook plugin in about 10 seconds. No code to copy and paste, tweak, and publish. No touchy files to mess with. This is all you have to do.
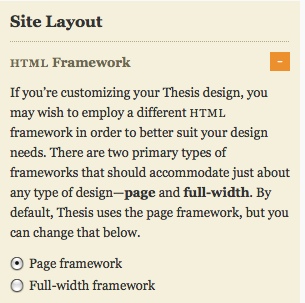
 1. First, this tutorial works for adding custom headers with a Page-Framework. You can check this by going into your Thesis Design Options, then clicking on site layout, and then checking the page framework button. (This is usually checked by default when you install Thesis, but go ahead and check just to make sure.)
2. Make sure you have downloaded and updated the latest version of the Thesis Openhook Plugin.
3. Make sure you have added your header image to your media files and that you copy the complete url for where that file is located. For example: http://your wordpressblog.com/wp-content/uploads/xxxx.jpg
Your header dimensions will vary based on the dimensions of your site. You may be using Thesis out of the box or you may have had some tweaking done. You also want to consider how much of your prime “top of the fold” area you want to dedicate to a header. I don’t want to give much, so the dimensions for my header are 1010 x 142 pixels. My header does not have a white background so I wanted it to reach completely from left to right. That’s why it’s so wide. Typical out of the box dimensions could be 959 x 150 pixels, but if your header has a white background you could actually play a lot around with the dimensions.
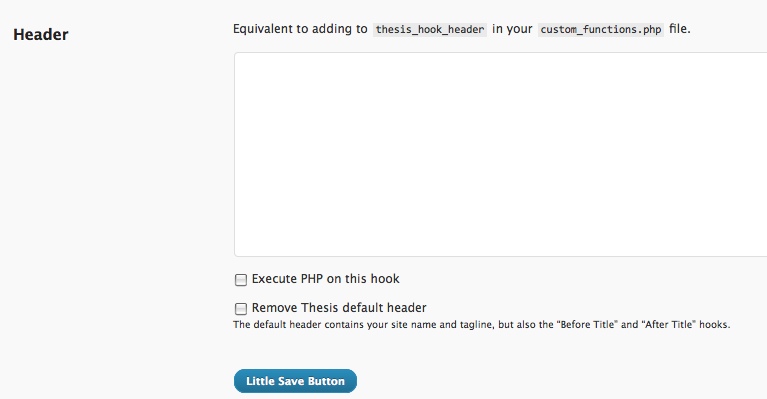
4. Click on the Thesis Openhook link and scroll to the Header hook. You can simply scroll down to find the header hook area or you can use the “select a hook” scroll down bar in the bottom right hand corner to find the header hook area.
4. Now here’s the easy part, all you have to do is add a little html code to establish the image location. Example: <img src=”http://your wordpressblog.com/wp-content/uploads/xxxx.jpg”>
5. If you want to make your header image clickable, just add a little more html code: <a href=”YourSiteLink.com”><img src=”http://your wordpressblog.com/wp-content/uploads/xxxx.jpg”></a> *(This step is optional)
6. To finish, click on the “Remove Thesis Default Header” box, so that your title and subtitle doesn’t appear on top of your new header image. Instead, your header takes the place of the header title and subtitle.
7. Click on the Little Save Button.
8. Ta-da! Your header image will appear and all is right with the world.
Lisa Angelettie
Latest posts by Lisa Angelettie (see all)
- Back Matter 101: How To Add Killer Call To Actions To Your Books - August 3, 2015
- Shelfari Is No Longer An Option In Author Central - July 28, 2015
- What Are The Most Well-Read Cities In America? - June 2, 2015

Hi Lisa,
Thanks for the info… I’m having some alignment issues with the header when place via openhook? Any thoughts on how to solve it?
Is there anyway that I can see it?
What’s your url?
A lifesaver. Thanks! I couldn’t get the clickable part to work — probably due to my own coding ignorance. But after an hour of screwing around looking up solutions on the web for adding a header to my blog, this was by far the best, easiest solution I found. Thanks!
Thanks so much! This worked like a charm. So easy!
Thanks so much for this post. Any chance you can explain how you made your header image the full width of the page? Thanks so much
Thanks Lisa,
This really helps to understand using the Open-Hook plugin. I needed a quick fix for a header and this was it!
Mark
You’re welcome Mark:)
Hi Lisa!
LOVED your advice. Thank you so much! I found that I have a ginormous gap between the banner and the menu. Can you offer any suggestions?
Thank you again!
Pat
Hi Lisa,
Thanks for this very clear and helpful tutorial. I’m wondering how you got the sign-up form in your header. Do you have a tutorial on that, by any chance?
Good post. I learn something new and challenging on blogs I stumbleupon everyday.
It’s always exciting to read through articles from other writers and use
something from other websites.