How To Customize Your Facebook Fan Page – Part 1
First of all, I want to start off this article by saying that I am no social media maven. That’s for sure. I’m learning about Facebook just like everyone else out here. Taking it one day at a time and building a base, but I am also sort of a “geek” and I really wanted to customize my article marketing Facebook fan page myself without paying someone a zillion bucks to do it.
See this is the thing. There are many people out there are who are willing and able to charge you great deals of money to teach you something that you could probably figure out on a lazy Saturday afternoon – all on your own. I’m not trying to take money out of their pockets, but let’s be real here, if you are a beginning marketer I can think of a lot of other things that you could spend your money on.
I’m going to tell you how to customize your Facebook Fan Page in a few easy steps (and in 3 posts) and if you need any more direction than that – then of course I urge you to go to the Facebook experts! So let’s get started…
Step 1 – Create Your Fan Page
If you have a regular Facebook account, you can create a Fan Page. Now your main account and your fan pages will be connected; as far as I know there is no getting around that unless you create a separate Facebook account strictly for that purpose.
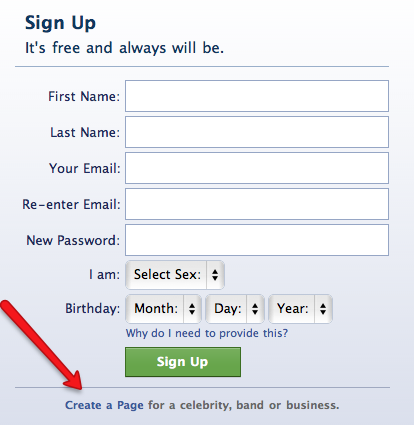
Now let me say that Facebook is a little weird. You would think you could go into your account section and add a page, but you can only manage existing pages there. So the easiest solution is to LOG OUT of your Facebook account, and get back to the Facebook home page. At the bottom of the sign up area, you will see the link for creating a Facebook page. Just click on that link and create your page.
There will be a choice to create a celebrity or personality page, a page for a musical band, or for a product, business etc. There isn’t much difference accept for the details that you can include in the info sections, so just pick the one that makes the most sense for your business.
Step 2 – Add Your Profile Avatar
Here’s where you can start spicing things up! Depending on how you are branding yourself, you will want a nice big avatar of either yourself or a banner featuring your product, benefits, etc. I was not really sure about how large you can actually go with this avatar (FB says 4mb max), but I just modeled what everyone else seemed to be doing.
So my profile avatar for http://facebook.com/Article.Marketing.Income/ is the one you see in the first pic on the left hand side. The size of the avatar is 200 w x 600 h pixels. I used Photoshop to make my avatar but there are lots of free Photoshop alternatives out there as well. So anyone can do this.
Adding an avatar of this size adds a little depth to your fan page and is a good area to play on your brand’s logo or to showcase the benefits of your business, your service, your product, etc.
In my next post, I’ll talk about how to create another tab on your fan page and how to edit or remove the other tabs.
Lisa Angelettie
Latest posts by Lisa Angelettie (see all)
- Back Matter 101: How To Add Killer Call To Actions To Your Books - August 3, 2015
- Shelfari Is No Longer An Option In Author Central - July 28, 2015
- What Are The Most Well-Read Cities In America? - June 2, 2015


Lisa, thank you so much for this article. I spent most of last night trying to figure out how to create a page on Facebook. And then like magic, I open my email this morning and you tell me exactly what I need to do. My page is still a work in progress, but I’m leaps and bounds ahead of where I was thanks to you.
So glad I could help. Facebook is a little hard to figure out. Link to your new page in the comment section when your done:) I’d love to “Like” it.