With plenty of advance warning from Google, Keyword Planner has now finally replaced their Keyword Tool. If you’re like me, you probably used Keyword Tool quite a bit to do some of your keyword research for blog posts, articles, book topics, and other SEO for your business. Because I absolutely LOVE keyword research and am a bit OCD about it, I like to do “layers” of keyword research for anything I write. This is all about living by one of my writing principles which is to always write with a purpose. I never aimlessly write anything and neither should you. Your time is precious and every minute counts.
My first layer of keyword research always begins with Google’s Keyword Tool (now Keyword Planner) primarily because at first I only want to identify a variety of keyword phrases related to my topic AND I want to isolate those phrases which have decent amounts of traffic (at least over 3,000 monthly views). I’ll do my deeper research on competition for these phrases using a more robust keyword tool like the LongTailPro Keyword Research Tool. For what I want to do first though, Keyword planner will help me do it rather quickly.
1. You Need An Adwords Account To Login to Keyword Planner.
With the old version, you use to be able to directly access the tool and use a CAPTCHA if you weren’t logged into Adwords to prove that you were a human being. That is no longer the case. Everyone has to log in. Don’t worry if you don’t have an Adwords account. There is no cost to open one and there is no requirement for you to start making an ad. If you already have a Gmail address, use Google analytics or Adsense then you already have a Google account and all you need to do is log into that account and sign up for Adwords. If you don’t use any Google products, you can easily just sign up for a free account in Adwords.
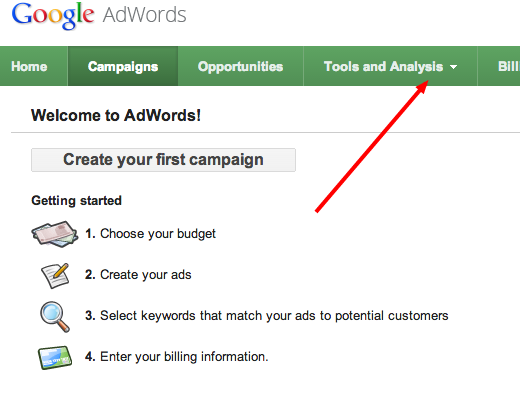
Once you login you’ll see the main Google Adwords dashboard asking you to create your first ad. You will instead click on the Tools and Analysis Tab and in the dropdown menu you will see the option for keyword planner.
2. Search For Keywords
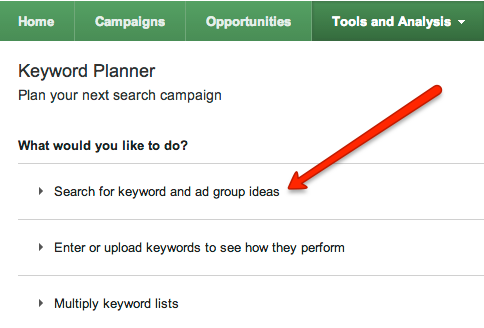
Next you’ll be asked what you want to do and so next you’ll want to select search for keyword and ad group ideas.
3. Customize Your Search
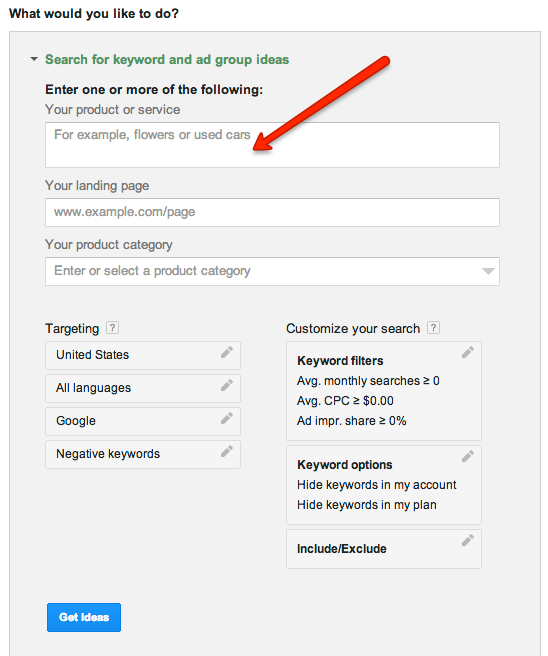
Next is the area where you add your primary keyword or keyword phrase and set up your filter options. For example, if you want to do keyword research on clean energy just type clean energy into the first box (where the arrow is pointing).
Most of the default options are fine for a basic search but you may want to play around with some of the targeting or customized features. For instance, I add the feature of making sure that my results only show results for phrases that get at least 3,000 searches a month. Just click on keyword filters and add the number in the average monthly search box.
4. Keyword Planner Uses Exact Match By Default
In the old version, you had to select whether you wanted to search for your keywords using broad, phrase, or exact match– but it used “broad match” by default. That proved to be disastrous for a whole lot of people, because using a broad search gives you skewed “inflated” results. You may think 10,000 people search for your term every month when if you did an exact search for the term you would find that actually only 2,000 people do. So one thing that the new keyword planner has gotten right is making sure that “exact match” is the default search filter. So you won’t see that option in the filter area like you use to. I love this change!
5. Get Your Keyword Results
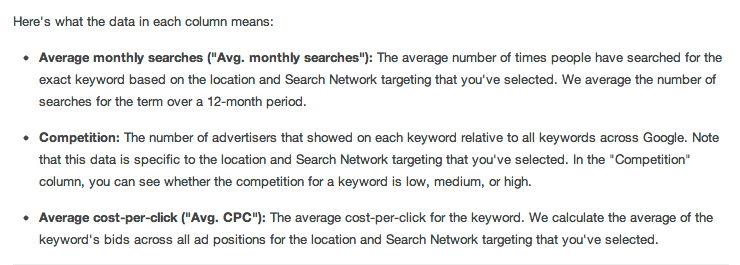
By default the planner takes you to ad group ideas first, but we don’t really want to use that for our research purposes, so just click on the next tab named “keyword ideas”. It’s here where you’ll see average monthly searches, rate of competition (for ads), and average cost per click of an ad for that keyword. Below is how Google describes what the data in each column means.
6. Save Your Keywords
If you want to save your keywords which I highly recommend so that you have an easy go-to list when doing your long tail research, it’s easy to do by simply clicking on the download ideas tab and it will save in Excel CSV format.
Tada! The End. Simple wasn’t it? If you have any questions or tips to share about the new version of Google’s Keyword Planner keyword tool then feel free to add your two cents in the comment section below and on Facebook and Twitter.
Resources:
Google Keyword Planner Documentation: https://support.google.com/adwords/answer/2999770?hl=en&ref_topic=3175091
Long Tail Keyword Tool: LongTail Pro


