Lisa Angelettie

Bestselling Amazon Author

  • START HERE
  • BOOKS
  • COURSES
  • RESOURCES
  • HIRE LISA
  • BLOG
You are here: Home / Archives for Google Tools

Troubleshooting Your Google Authorship

September 4, 2013 By Lisa Angelettie 6 Comments

troubleshooting-google-authorship

I try to set aside a working day every month or so to do something I (not so fondly) describe as “clean up day”. This usually means digging in the archives of my hard drive and tossing out applications or files that I don’t need and other things of that nature. One thing that was on my “to do” list for ages was troubleshooting why my Google Authorship was working on some pages and not others.

I played around with this a little a few months back, but gave up after a time because I felt like I had better things to do. But I’m going to be honest here, getting Google Authorship right is important especially for a writer. When I see the picture of an author by an article that I have searched for on the web, it immediately gives me the impression that this writer is credible, that I kind of know the person or at least can connect with them on a human level, and entices to me to click rather than on the search results without Google authorship. Why wouldn’t I want that same advantage for my own work?

There are a lot of tutorials on the web (I published one back in 2011) that tried to simplify what Google did a very poor job of explaining to us lay people…how to get the darn thing to work. Since then there have been WordPress templates (Genesis), WordPress plugins, and more tutorials which have popped up all over the place trying to make it a bit easier to accomplish.

I used a lot of these solutions when first troubleshooting my Google Authorship, but every time I went to test my site in the Google Structured Data Testing Tool a.k.a. rich snippets testing tool (you’ll find this in your Google webmaster tools area), there was always something not working. Some pages would work, but not all. You may not even know that your authorship isn’t totally working if you don’t test several different pages in the testing tool, so here’s my advice:

1. Identify the websites, pages, and posts you’d like associated with your Google profile.

In most cases, the obvious answer is all of them, but remember this includes all your guest posts too. There are a lot of major sites out there who have set up Google authorship for themselves but not for their guest posters, so it’s critical that you identify yourself as a contributor to sites like this and link those articles to your Google+ profile.

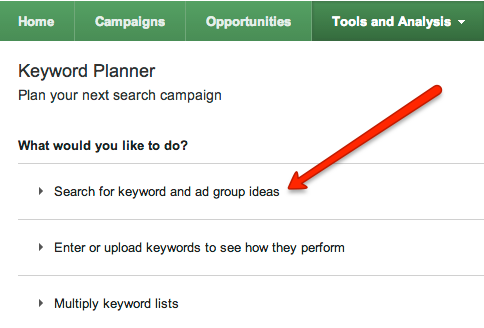
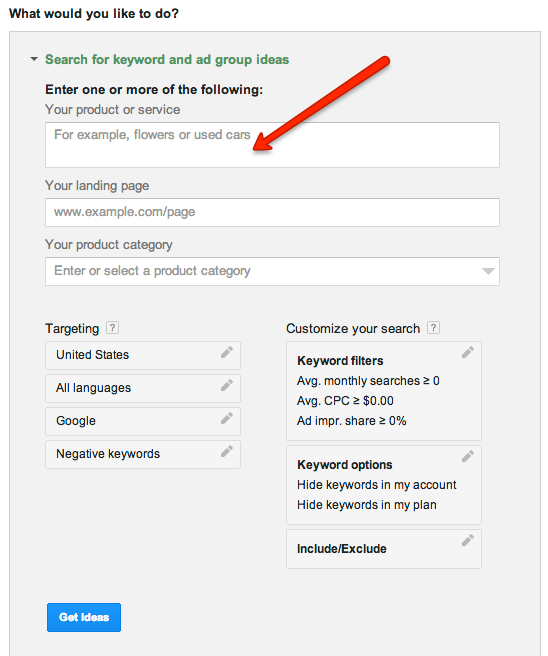
2. Test a few of your most important pages in the Structured Data Testing Tool.

I made sure to test my main site’s url, my high traffic pages, my popular guest posts, reviews, etc.

google authorship testing


3. Establish More Direct Connections

Most tutorials instructed us to link from our Google+ profile to an ABOUT or BIO page on our site. This has varying results, so one thing you can do is to make more direct connections from your articles/posts to your profile. Now if you have hundreds of posts this might not be the right solution, BUT if you identify the posts that are high ranking in search results you might narrow that number down quite a bit and then can manually add your link to the end of your posts. Perhaps you could add a copyright notice.

Example: © <a href=”[Google+ Profile Url]?rel=author”>Lisa Angelettie</a>

4. Layer Your Solutions

Honestly, I don’t know what ONE solution ended up being the ticket for me. I have layers of solutions:

WordPress Plugins

2013-09-04_1830 2013-09-04_1831


Thesis Theme Skins

I use Thesis as the template for my site, but I use a “SKIN” on top of it to make it look the way it does. An email optin box at the top and bottom of my site AND the option of adding an author box to the end of every post. This author box is where you can add your Google+ link.

Manual Linking

I have added the direct links to my profile manually on certain pages on my site and to certain guest posts.

That’s how important it is to me to achieve Google Authorship and finally it works!!! I hope this was helpful to you in some way. If you have any questions or tips please add them in the comment section below. Now go out there and claim your content!


Filed Under: Social Marketing Tagged With: Google Authorship, Google Tools, Google+

How To Use Google’s New Keyword Planner For Quick And Easy Keyword Research

August 27, 2013 By Lisa Angelettie 14 Comments

With plenty of advance warning from Google, Keyword Planner has now finally replaced their Keyword Tool. If you’re like me, you probably used Keyword Tool quite a bit to do some of your keyword research for blog posts, articles, book topics, and other SEO for your business. Because I absolutely LOVE keyword research and am a bit OCD about it, I like to do “layers” of keyword research for anything I write. This is all about living by one of my writing principles which is to always write with a purpose. I never aimlessly write anything and neither should you. Your time is precious and every minute counts.

My first layer of keyword research always begins with Google’s Keyword Tool (now Keyword Planner) primarily because at first I only want to identify a variety of keyword phrases related to my topic AND I want to isolate those phrases which have decent amounts of traffic (at least over 3,000 monthly views). I’ll do my deeper research on competition for these phrases using a more robust keyword tool like the LongTailPro Keyword Research Tool. For what I want to do first though, Keyword planner will help me do it rather quickly.

1. You Need An Adwords Account To Login to Keyword Planner.

With the old version, you use to be able to directly access the tool and use a CAPTCHA if you weren’t logged into Adwords to prove that you were a human being. That is no longer the case. Everyone has to log in. Don’t worry if you don’t have an Adwords account. There is no cost to open one and there is no requirement for you to start making an ad. If you already have a Gmail address, use Google analytics or Adsense then you already have a Google account and all you need to do is log into that account and sign up for Adwords. If you don’t use any Google products, you can easily just sign up for a free account in Adwords.

Once you login you’ll see the main Google Adwords dashboard asking you to create your first ad. You will instead click on the Tools and Analysis Tab and in the dropdown menu you will see the option for keyword planner.

keyword planner

2. Search For Keywords

Next you’ll be asked what you want to do and so next you’ll want to select search for keyword and ad group ideas.

keyword ideas

3. Customize Your Search

Next is the area where you add your primary keyword or keyword phrase and set up your filter options. For example, if you want to do keyword research on clean energy just type clean energy into the first box (where the arrow is pointing).

Most of the default options are fine for a basic search but you may want to play around with some of the targeting or customized features. For instance, I add the feature of making sure that my results only show results for phrases that get at least 3,000 searches a month. Just click on keyword filters and add the number in the average monthly search box.

keyword phrases

4. Keyword Planner Uses Exact Match By Default

In the old version, you had to select whether you wanted to search for your keywords using broad, phrase, or exact match– but it used “broad match” by default. That proved to be disastrous for a whole lot of people, because using a broad search gives you skewed “inflated” results. You may think 10,000 people search for your term every month when if you did an exact search for the term you would find that actually only 2,000 people do. So one thing that the new keyword planner has gotten right is making sure that “exact match” is the default search filter. So you won’t see that option in the filter area like you use to. I love this change!

5. Get Your Keyword Results

By default the planner takes you to ad group ideas first, but we don’t really want to use that for our research purposes, so just click on the next tab named “keyword ideas”. It’s here where you’ll see average monthly searches, rate of competition (for ads), and average cost per click of an ad for that keyword. Below is how Google describes what the data in each column means.

keyword statistics

6. Save Your Keywords

If you want to save your keywords which I highly recommend so that you have an easy go-to list when doing your long tail research, it’s easy to do by simply clicking on the download ideas tab and it will save in Excel CSV format.

download google keywords

Tada! The End. Simple wasn’t it? If you have any questions or tips to share about the new version of Google’s Keyword Planner keyword tool then feel free to add your two cents in the comment section below and on Facebook and Twitter.

Resources:
Google Keyword Planner Documentation: https://support.google.com/adwords/answer/2999770?hl=en&ref_topic=3175091
Long Tail Keyword Tool: LongTail Pro


Filed Under: Book Marketing, SEO Tagged With: Google Keyword Planner, Google Tools, Keyword Planner, Keyword Research, Keyword Tool

How Google’s Latest Penguin 2.0 Update Affects You

May 23, 2013 By Lisa Angelettie 8 Comments

penguin 2.0Google has released their latest algorithm update which they have named Penguin 2.0. According to Matt Cutts (head of Google’s web spam team), this update will have an even stronger impact than Penguin 1.0 did, so I thought it would be worth talking about today. If you own a website/blog then you need to care about this. A lot of people get a little glassy-eyed when I start talking SEO stuff, so I’m going to keep this really simple. What are some of the changes webmasters like us can expect and how will it matter.

Most of my readers are not into black hat SEO stuff. Link spamming, blog networking, etc. and according to Google that’s who ALL of their updates have targeted, but that simply isn’t true. If you are a small business owner, entrepreneur, or novice web master/blogger then you could have made tons of SEO mistakes inadvertently and paid the price for it when Google rolled out their updates. Especially because many of the strategies site owners were taught to do years ago were perfectly fine by Google and they worked, but were abused by some web owners, so the rules have changed. Penguin 2.0!

Changes to expect:

1. SPAM

Obviously first and foremost, Google is looking to eliminate spammy sites. Many web owners have complained that after their last 3 Penguin related updates, that there were still many spammy sites outranking them in the search results. I agree. I saw this too in my space on the web as well. Google is never specific about the indicators they are looking for when deciding if a site is user friendly vs spammy, but let’s hope they start with the obvious culprits. Sites that are keyword stuffed, outdated, and have no social signals.

My one takeaway on this area is that it’s important that you continue to INCREASE the freshness of your site. You do this by writing and publishing content on a consistent basis AND you do this by having social signals point to your content, share your content, or leave comments on your content.

2. PAID LINKS

Google has a basic rule when it comes to paid links, advertorials, etc. They don’t want those links passing PAGE RANK. So for example, if you have a page on your site that is quite popular and ranks well in the search engines you may get an email from a company asking if they can place a link on that page. Or perhaps your entire site ranks well and they would like a sponsored blog post. While they are not saying that you can’t do this, what they don’t want is for these links to carry page rank from your site to theirs. Most sites requesting this type of link are spammy, junky, or low ranking sites. They want your Google juice! Which will make them more important in the search engines, but not because of the quality of their content, but because they paid for the link.

So here’s how this can affect you. Say you have a content rich blog and someone wants to add a link to a certain page. The link needs to be a “NOFOLLOW” link so that essentially the only benefit that the advertiser gets is whatever traffic you send them from that page. Traffic vs. Rank. That’s the takeaway here.

3. RECOGNIZING AUTHORITY SITES

One thing that Google wants to do a better job of is recognizing websites that are an authority on their topics and ranking them accordingly. That’s great news for authors and solopreneurs who write on a specific, niche focused topic.

4. VARIETY OF SEARCH RESULTS

There were some user complaints that when they conducted a search that one site would have a cluster of results on one page which obviously knocks out a lot of other user friendly search results. Clearly this is aimed at the web juggernauts. Off the top of my head, there was a time when the site About.com would have a cluster of results for a particular term. I don’t know if that’s true anymore for this particular site, but this is the type of thing that they are looking to change. Users don’t need 6 results from the same website. They want to see a variety of search results.

5. MORE INFORMATION TO WEBMASTERS (When hacked, How to fix stuff, Etc.)

Users have claimed for YEARS that Google does not do a good job of telling webmasters when something is wrong so that they can fix it before they are bumped from search engine results. Hey…most of us don’t know the Google “rules” as they certainly do change from month to month, year to year. So one thing they said they are working on is to notify webmasters of issues.

Allow Google to communicate with you by verifying your website in the Google Webmaster Tools section which is quite easy to do. You just need to already have a Google account which you already have if you have a gmail email, are on Blogger, Google+ profile, etc. Go to your Google dashboard and search under “products” for Webmaster Tools. Add and verify your site and Google will communicate with you if there is an issue. In addition they are working on adding better documentation on what to do to fix your issue once Google alerts you of it.

6. FIX SOME PANDA ISSUES

Lastly, Google’s Panda update was a nightmare for many legitimate site owners and Google has recognized that they need to tweak their parameters for the changes that this update caused. So they are going to implement some tweaks that are suppose to be especially helpful for the little guys (like us!).

Want A Little Extra SEO Help?

If you own a website/blog and aren’t sure if you’re optimizing it according to new Google standards, feel free to hire me for a SEO strategy session.

Join The Conversation

Feel free to join the conversation and share some of your Google Penguin strategies or stories.

Filed Under: Content Writing, SEO Tagged With: Google Tools, Panda, Penguin 2.0, SEO

How To Get Your Picture In Google Results: Google Authorship

October 11, 2012 By Lisa Angelettie 11 Comments

How I Claimed My Content In Google

google authorship example

If you’ve conducted a search for a topic lately in Google, you will have noticed that for some of the results the author’s photo, name, and Google+ circle information is included with the results. This is a great way to stand out in the search engine rankings and further establish your credibility in your marketplace. Actually there have been some recent statistics that show that people click on these types of results (also called rich snippets) 150% more than a regular result. Which makes a lot of sense. They really do stand out and ultimately what you are doing is “claiming your content” in Google.

So I did a little research around this and learned that this type of result is called  Google Authorship Markup and while Google has directions for how to do this, they were a little complicated. I did a little more research and found some directions on a few websites, but each one varied on their steps. One I found helpful was neil Patel’s over on Quicksprout.

Ultimately after some reading various articles, I had to combine the directions from several sites and test. Some didn’t work out for me and I really don’t know why. So I’m not going to even speculate. Eventually I figured out the steps that worked for me, and so I thought I’d share them with you today so that readers can start to see your name and face as the author of many of your articles.

Fill Out Your Google+ Profile…

Step 1 – Add & Verify Your Email Address

You first have to make sure that you have filled out your profile on Google+. You don’t need to actively use this social media tool for authorship to work, but I highly recommend getting active with this social media platform because it can directly influence your rankings (although they won’t readily admit that:). When you fill out your profile, you’re going to add an email address.

Important: This email address needs to be one from your domain. So for instance, an email I may use is info [@] LisaAngelettieBlog.com. Not a gmail or other free one. This shows that you are a serious author and it will show Google that articles published by the author with the same name and email address are connected.

You’ll have to verify that email address and G+ will send you a verification link to that email address, that you’ll click to verify.

Step 2 – Add Your Content

Now you have to connect your content to your profile. Google needs to know where you publish. In the CONTRIBUTOR area of your profile, you will want to add your own website url as well as any other websites you regularly contribute to so that your profile will show up for those article results as well. But let’s focus on your site for now. Add your full site’s url. When you save, you will see something similar to the image below. The title of your site will be what see in the “contributor” area.

google authorship content

Step 3 – Check Your Byline

Make sure that your byline on your website MATCHES the name on your Google+ account or they will not be able to recognize you as the author.

Add Appropriate Linking Code To Your Site…


Step 4 – Adding the REL paramaters

Okay, here is where things get a little muddy. I tried a variety of strategies to get things to work for me so I’m going to tell you everything I put in place to get things working. You may not have to do all of these steps, but honestly it takes like 5 minutes so you might as well go ahead:)

On your HOME page, you should have links to your social media profiles. They could be displayed discreetly or prominently but they should be there so that the search engines can easily see them when they spider you site. One of those profiles should be to Google+ and be linked to your profile there. When you create this link though, you will add a little REL code to the end naming you as the “PUBLISHER” of the content on your site.

Example: <a href=”https://plus.google.com/107100109138758990604?” rel=”publisher” target=”_blank”>

On the ABOUT page on your site, you should add a link to your social media profiles as well. Link the G one to your profile page BUT also include the REL tag of “ME”.

Example: <a href=”https://plus.google.com/107100109138758990604″ rel=”me”>


Step 5 – Test Everything

Okay now that you have everything linked and saved, it’s time to test. You can do this by using the rich snippet testing tool. Be patient, because sometimes it can take some time to show up in the search engines, although I was able to pretty much see immediate results.


When Guest Blogging

When you are guest blogging, most sites will feature an author box or they will add a few lines of your bio to the end of your article. If you are able to add several links to that bio which most sites will allow, here’s what you need to do:

First – Link your author name to your ABOUT page. Remember this page has your G+ profile link.

Second – Link to your G+ profile but just make sure to add the REL=”author” code to the end of that link. This let’s Google know that you are indeed the author of that particular article. Example: Example: <a href=”https://plus.google.com/107100109138758990604″ rel=”author”>

Third – Add the link to your guest post into the CONTRIBUTOR section of your G+ profile. If you guest post a LOT this could end up being a cumbersome task but well worth it to you if it increases your conversion rate like the statistics suggest. Another strategy could be to only link to the higher profile sites you guest post on and not some of the smaller ones — but in my opinion it’s worth the extra 3 minutes that it takes.

I know that there are several other workarounds for claiming authorship in the big G, so do have any other tips for implementing this authorship strategy? Let us know!


Filed Under: Article Blogging, Content Marketing, SEO Tagged With: Google Authorship, Google Tools, Google+

Google Scholar

January 12, 2012 By Lisa Angelettie 2 Comments

Want To Refer To Scholarly Publications In Your Work?

Are you in a niche where you’d like to write content that references scholarly content from academic publishers, universities, professional societies, librarians and more? Using these types of references in your work can dramatically add to the credibility of your articles and they are easier to find than you may think. Simply use Google’s search engine for scholarly search: Google Scholar.

google scholar

Want To Be Considered A Scholarly Resource?

If you are an educational professional, etc. and would like the content of your site to be considered as a resource for the Google Scholar search engine, here are the content guidelines straight from the horse’s mouth that you need to consider:

Content Guidelines

  1. The content hosted on your website must consist primarily of scholarly articles – journal papers, conference papers, technical reports, or their drafts, dissertations, pre-prints, post-prints, or abstracts. Content such as news or magazine articles, book reviews, and editorials is not appropriate for Google Scholar. Documents larger than 5MB, such as books and long dissertations, should be uploaded to Google Book Search; Google Scholar automatically includes scholarly works from Google Book Search.
  2. Users click through to your website to read your articles. To be included, your website must make either the full text of the articles or their complete author-written abstracts freely available and easy to see when users click on your URLs in Google search results. Your site must not require users (or search robots) to sign in, install special software, accept disclaimers, dismiss popup or interstitial advertisements, click on links or buttons, or scroll down the page before they can read the entire abstract of the paper. Sites that show login pages, error pages, or bare bibliographic data without abstracts will not be considered for inclusion and may be removed from Google Scholar.

Filed Under: Content Writing, Writing Articles Tagged With: Google Tools

Google Will Announce Duplicate Content Issues To Webmasters

December 5, 2011 By Lisa Angelettie 7 Comments

News: Google Will Announce Duplicate Content Issues To Webmasters

I have written extensively about how to avoid penalties by Google a.k.a. The Google Filter,  but if you haven’t been paying attention you’re in luck. Google has recently announced that they will now notify webmasters when they have made a cross-domain URL decision involving your site.

What this means is that when similar or duplicate content is present across more than one domain, Google will choose one of the URLs to index. When this cross-domain URL decision is made, some of your content may not be getting indexed in favor of another URL. The decision is typically made in favor of the more “important” domain. (It’s more important than ever now to get your social media content game on!)

While there are multiple reasons for there to be duplicate information on more than one site, it’s never good when you’re on the losing end of the deal. This is why Google has decided to send you a notification when they need to make this decision. That’s cool right? At least we know and can make some sort of movement to make the changes necessary if we end up with the short end of the stick.

Currently, Google only sends the notification to you within Webmaster Tools. Which you will find in the admin section of your Google account. Remember that if you have Gmail, Adwords, Analytics, or some other Google product that you automatically have a Google account. So, be sure your site is claimed within Webmaster Tools and have it set up to send you an email regarding all new notifications that come in.

Filed Under: Content Marketing, SEO Tagged With: Article Marketing Duplicate Content, Duplicate Content, Google Tools, SEO

How To Add Facebook & Twitter Stream To Google+ Plus

November 13, 2011 By Lisa Angelettie Leave a Comment

Learn How To Add Facebook & Twitter Stream To Google+ Plus In 60 Seconds!

Here’s a quick Social Media Content Nugget for you to implement this week…

I’ve been a slow adopter, but I am starting to see the benefits of really using Google+ for business. First of all there are totally different users and friends that I have met on Google+ than I have on any of my other social networks. For some social butterflies – this is less than appealing.

But for REAL business owners like you and myself – this is great. A totally different group of folks are attracted to Google+ and with 40 million members and rising – let’s just say that there must be a lot of ’em! So this week I’d love for you to spend a little time over on your Google+ page. Spruce up your profile. Add a few photos. Get into a few circles.

Now after you’ve done that, it’s time to ramp things up a bit. One of the great things about social media is that the big daddy’s in the social media market are really starting to work together.  Same goes for Google+. Or at least there are 3rd party developers out there making sure they work together:) So you can now add both your Facebook and Twitter stream to your Google+ which will only make for a more engaging stream by you.

Add Your Facebook Updates To Google+

Go to http://goo.gl/Xw38s, click “Get Google+Facebook” to install the plugin/extension and then you’ll see that next to the homepage button will appear also a facebook button.

Add Your Twitter Stream To Google+

Go to http://goo.gl/akULt and install the “Get Google+Tweet” plugin/extension the same way. Same thing will happen: next to the homepage button you’ll get another one for the twitter stream.

As you see, now there is a Twitter and Facebook button added to your homepage that you can click to read those streams.

add facebook and twitter to google plus

By the way: This is not supported by Safari yet.

*Source Gabriel Vasile

Filed Under: Content Marketing, Social Marketing Tagged With: Facebook Marketing, Google Tools, Google+, Twitter Marketing

Google Can Now Block Specific Search Results

November 9, 2011 By Lisa Angelettie 2 Comments

With Google’s Help You Can Block Specific Search Results — Is This A Good Thing?

I was conducting a Google search for a client while creating her Content Makeover and came across something really interesting. I saw her name in a Google result for what looked like a Mompreneur business site and wanted to check it out. When I did I was taken to a generic holding page. One that you would see if you purchased a domain name but haven’t set up a set yet on it. So that mompreneur site that she was on – was now defunct. But what happened next was even more interesting…

When I returned to the original search results, Google asked me when I scrolled over that same result if I wanted to block this url from further results. Funny thing is – I did! I mean the site no longer exists so there’s no need for me to see it while I’m conducting a search for this client. So I clicked yes – and so this is what I saw:

google blocked result

Then I thought about it again and realized that if I did another search for another client that I wanted to at least be able to see if the search engines were returning results for this site and my client. I need to know if this result was taking up valuable space on page 1 for any of my clients. So I wanted to undo the block. Instead of Undo, I clicked on Manage Blocked Sites just to see what would happen and I saw this site listed as well as the search term I used to get the result. Plus there was this from Google:

If you don’t like a site that appears in your search results, you can block all the pages within that site. Then you won’t see any of those pages when you’re signed in and searching on Google. If you change your mind, you can unblock the site later. Sites will be blocked only for you, but Google may use everyone’s blocking information to improve the ranking of search results overall.

You may block up to 500 sites.

So these are my initial thoughts:

1. I like this feature for my own use, but only temporarily. I don’t want to really ever totally block a site unless it’s pornographic, racist, or violent.

2. I don’t like this feature as a business owner. If my site comes up for a result and another and another — I want the person searching to see that yes I am the totally relevant business for the term you are searching for. You must recognize!! If someone can block me, then I am off their radar. Perhaps for forever because how many people are really going to “manage their blocked sites” or “undo” what they did. Most people are going to forget that they even blocked a site.

FYI – I was logged into one of my Google accounts when I was performing this search but it will ask you if you want it blocked whether you are signed in or not.

Bonus Tip – Not sure who owns this domain at this point since there is no longer a site but there is a holding page — but if this is your niche, this may be a domain name you want to investigate buying or back ordering it over at seodomainhosting.com because it still is returning MAJOR rankings. You can capitalize off of it’s PR ranking and search engine juice by snatching up the name.

Would love to hear your thoughts on this feature from Google?

Filed Under: Content Marketing, SEO Tagged With: Content Makeover, Google Tools

  • 1
  • 2
  • 3
  • 4
  • Next Page »

Search Me!

READ ON KINDLE

MY FAV’ WRITING TOOL

Scrivener

PERSONAL CONSULTING

FREE WORDPRESS PLUGIN

IMPORTANT LINKS

Subscribe To This Blog On Kindle
Wordpress Guest Post Plugin
Testimonials
Newsletter
Terms of Use
Copyright
Privacy
Disclaimer
Contact Me

From The Blog

  • Back Matter 101: How To Add Killer Call To Actions To Your Books
  • Shelfari Is No Longer An Option In Author Central
  • What Are The Most Well-Read Cities In America?
  • Google Play Is Closed To New Publishers
  • Kindle Blog Publishing Is Amazon Bestseller!

CONNECT WITH ME

Twitter
Facebook
Google+
LinkedIn

Copyright © Lisa Angelettie · Powered By Hostgator And A Whole Lotta Love:)