Want To Create An Online Newsletter That Rocks? It Will Be The Best Thing You’ve Ever Done For Your Business. Welcome To The Beginner’s Guide To Creating An Online Newsletter That Converts Visitors Into Fans!

Image Credit: Charis Tsevis
As a content marketer one of the things that I love to do is to create niche websites in areas of interest to me. I have sites and ebooks in several niche spaces, but one of my first niches when I started online was the relationship and dating niche. Already a saturated niche, I took a different spin on it from a psychological standpoint since I had the background as a psychotherapist and did very well with my sites. Recently, I took a major hit in the search engines for several of those sites and my traffic stats dropped significantly. I could spend a lot of time ranting about why some of my sites took hits and others didn’t when I used the same content marketing and SEO principles for all of them, but that’s for another post:)
What I wanted to talk to you about today is the fact that my business was able to survive the search engine hit, because I still had my very responsive email subscriber list. That is what all those internet marketers are talking about when they say that the “money is in the list”. No matter what happens to the traffic to my sites, I can always go back to my list and promote something, share something, ask them something and I will always get a response — including a sale.
So if you’ve been thinking about starting your own online newsletter but weren’t sure about all the details, then I’m going to walk you through them today lickety-split, so that you are up and running in the next 30 minutes. It’s crucial to the survival of any online business.
STEP 1 – What Is An Online Newsletter?
Creating an online newsletter, email newsletter, digital newsletter is all the same. In essence you are writing a newsletter and sharing it digitally with whoever requests to read it on a regular basis. Do you need a newsletter if you have an RSS feed for your blog? The answer is yes. An RSS feed will announce to your readers every time a blog post is published on your site, but a newsletter permits you to send more customized and personal messages to your list at any given time. It also gives you the unique opportunity to allow your personality shine through your copy.
The first purpose of your newsletter first and foremost needs to be to inform, educate and entertain your readers. If you do not publish anything worth reading, or only send promotion after promotion, then you are missing the point and your newsletter will fail.
The second purpose of your newsletter is to establish a relationship between you and your readers. This is what trust-based marketing is all about. My subscribers depend on my newsletter to deliver them a certain level of quality information on a regular basis. Irregular contact will mean that people may forget who you are and unsubscribe from your list or even identify you as a spammer.
The third purpose of your newsletter is to convert readers into clicks, customers, or clients. The only way to achieve this though is to make sure that your fulfilling the first two purposes of newsletter publishing.
STEP 2 – Sign Up For Aweber
You might be tempted to send your emails through your email client (Outlook or Apple Mail) because it’s free, but that would be a big mistake — many of your emails will never make it through the robust spam filters of most servers and your email client will not be able to handle sending emails out as your list grows in size.
That’s why I highly recommend starting your newsletter list off right from the start with industry leader Aweber. They are always improving their tools, the customer service is top-notch, and they have tremendous features all at an affordable price. I know because I’ve used several other companies before finally making my “last” switch to them several years ago. I have been happy every since.
STEP 3 – Create Your First List
You can make as many lists as you like in Aweber. I have lists for several different sites and niches. It’s very easy to do this. So after you’ve registered and signed in, the next step you’ll make is to click on “create and manage lists”. Aweber also walks you through this process as well with their list wizard at the bottom of your screen.
STEP 4 – Complete Your Basic Settings
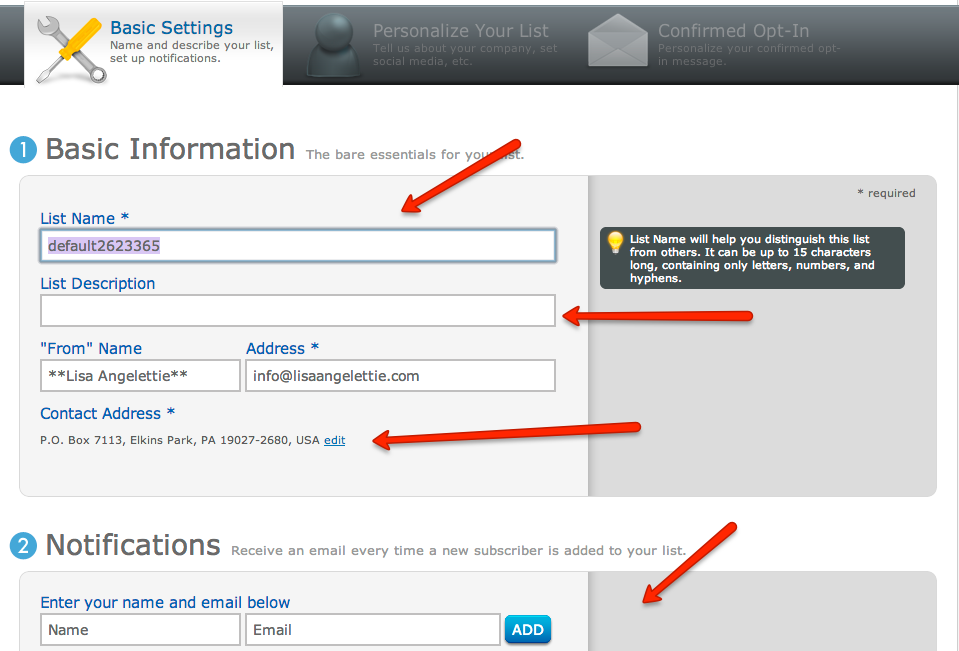
Here is where you fill out the name of your list (for your eyes only), list description (will be seen by people on unsubscribe page), contact information that subscribers will see in the “from” section of their emails, and a notification email address (this is where aweber sends you notifications that you have a new subscriber).
STEP 5 – Personalize Your List
This is where you can add a little personal touch to your list with your company name, logo, url, and email signature. Readers will see this in various places. This section is where you also set up your list to integrate with social media sites Twitter and Facebook. A feature you’ll love!
STEP 6 – Set Up Confirmed Opt-in Email
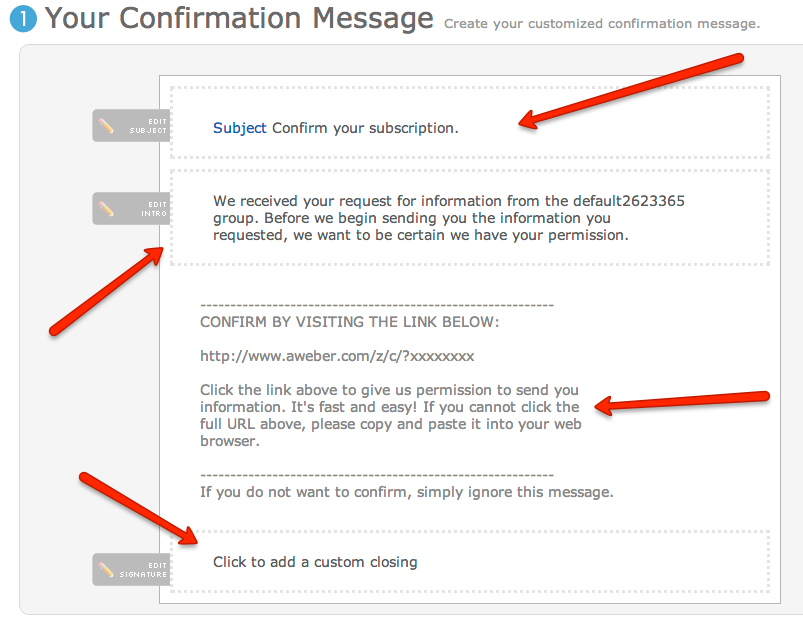
When someone subscribes to your list, Aweber will send them an email asking them to “confirm” that they requested to be put on your list. The reader then has to click on the link in the email to confirm. This is called a double opt-in process and it is the system that most reputable companies strongly encourage us to use in order to avoid problems with spamming.
So Aweber gives you the ability to customize this first “confirmation email” which is really important because some people won’t even remember that they initially requested information from you. It’s up to you to remind them. You can and should edit the subject, intro and signature areas of your email. Aweber gives examples of subject lines you can use and honestly you don’t have to do much editing. Just make sure to change the “list name” info in the intro section to the full name of your newsletter. Don’t keep the list name in the intro section that you used when you created the list.
Lastly, you have the option of sending the subscriber to a customized thank you page AFTER they’ve confirmed or you can leave it blank and use Aweber’s standard thank you page. I use a customized page made very easily by creating a page on my WordPress blog. Details you can include in this page are: thanking the reader for subscribing, whitelist information, or a link to download your free offer or promotion. This is the page I use where confirmed subscribers can download my free ebook guide: Make An Ebook Tonight.
STEP 7 – Understanding Messages
There are three types of messages you can make in Aweber: follow-up, broadcast, blog broadcast. The type of message you will be creating FIRST is a follow-up a.k.a. autoresponder message. This email will be sent immediately after the reader confirms their subscription by default, so here’s your chance to make a good 1st impression. In my follow up email I typically give the reader a second opportunity to download their free guide. You could also write an email detailing WHY the reader should stay on your list and what they can expect from you and your newsletter. Make sure to also include whitelisting information (your newsletter’s email address), contact information, and any other good business practices you can think of.
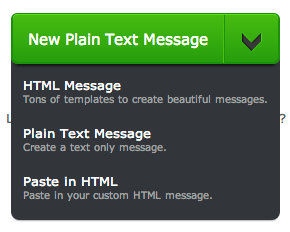
When you go to create your first message, you will see that you have the option of creating a plain text message, an html message (allows you to use fonts, pics, etc.), using one of Aweber’s templates, or an html message using your own custom html. Lots of options! (I will write more about how to use these various message formats in future articles and be sure to link them to this tutorial.)
To make things super simple today, I would make your first follow-up message in plain text format. Plain text has the highest deliverability rate. The biggest thing to remember is that you cannot use link text in plain emails, you have to use full urls ex. http://abc.com in order for them to be live working links.
Write your message within the margins that Aweber recommends so that your emails do not spread too widely in the reader’s email. SAVE your email.
STEP 8 – Test Your Email
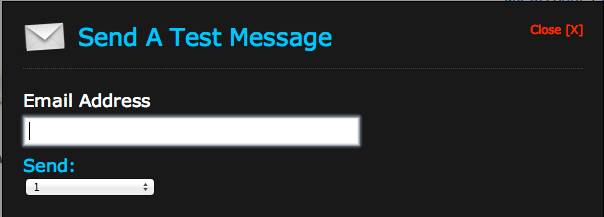
Aweber allows you to send yourself a test email so that you check exactly what your email is going to look like when you send it out. I do this before every weekly newsletter that I send out. You can do it right now to test your FIRST follow up message.
STEP 9 – Create Your Web Form
So how do you get people onto your newsletter list? This would be the perfect scenario: people search for a topic, find it on your website, read your article, then subscribe to your newsletter via web form to get to receive more of your information. In order for that to occur, you need a working web form that captures readers email addresses.
- You only have to capture an email address on a web form for it work.
- Email only forms typically convert higher.
- I like to send more personalized emails though, so I ask for first name and an email address on my web forms.
- You can create as many web forms as you like per list.
- Aweber provides analytics so that you can see what forms convert better than others
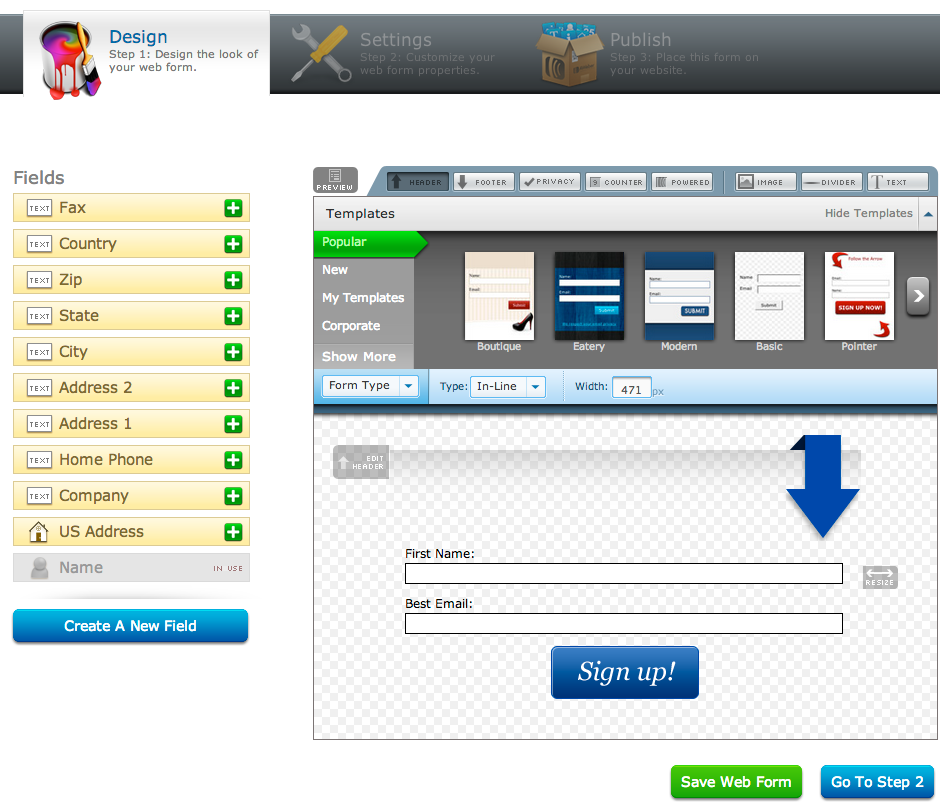
Select Your Template
Choose the design of your web form from the many options that Aweber offers. You can make a few edits to the web form such as adding your own headers and footers, changing the width of the form, including privacy policy info box, and editing the call to action button. Save. Hint: Adding a compelling call to action in the header of your opt-in box will improve conversions. Don’t just ask the reader to “join our list”. That’s borrrring:)
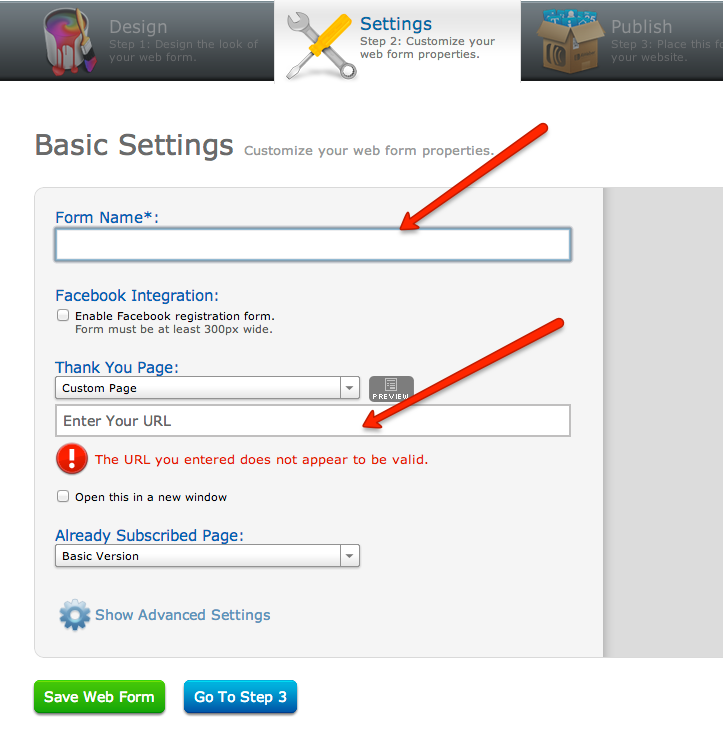
Basic Form Settings
Customize your form’s settings by giving it a name (for you only), adding a custom thank you page url or selecting to use one of Awebers (The thank you page is where subscribers go when they first opt-in. They haven’t confirmed yet), and any already subscribed page you may want to include. Including customized pages in this area is totally optional and you will be fine just using Aweber’s standard forms. They have a text, audio, and video version that you can use that work really well. I choose to use a customized version for branding purposes and to give the subscriber something to do next, but that is an advanced strategy that you can save for later. Save.
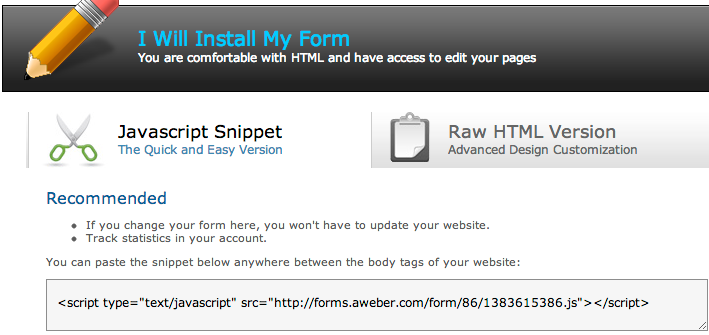
Grab Your Code
Now you are ready to publish your web form on your blog. The best position for your first web form is in the right hand corner or top of the right hand sidebar of your site. Statistics prove that this is where the eye travels first when a visitor visits your site. You can copy and paste the html code that Aweber gives you directly to any website or easily insert your web form into your WordPress blog using Aweber’s handy WordPress plugin.
STEP 10 – Publishing Schedule
Now that you have all the basics in place you are ready to make a big decision. Some entrepreneurs will send you a irregular “rant” and call that a newsletter. It is not. Some people will send you emails periodically about random topics and many of them will be promotional in nature — that’s not a newsletter. In my opinion, a newsletter is information sent to educate, inform, entertain and build a relationship with your reader on a REGULAR basis. That means weekly, bi-weekly, or monthly.
When you do this you will build FANS who not only invest in you but will spread the word about your message. When I surveyed my list, over 23% of them said that they heard about me from a word of mouth referral. Honestly, I attribute that to the fact that I stay in my readers inboxes every week.
Thank you very much for reading this tutorial today.
If after reading this and implementing you are stuck on article ideas for your newsletter, then please read on for additional information on generating article ideas. If you’d like me to do all the work for you, then take a second to look at my Editorial Calendar service.
Also, if you’d like to learn more about my own newsletter feel free to subscribe using the form below and when you do you will get a copy of my ebook writing and publishing guide: Make An Ebook Tonight as a free gift. Thanks again:)
Additional Reading:
- Writing Articles: Help For When You Run Out Of Things To Write
- Article Ideas: #1 Thing Your Prospects Want To Read
- Article Ideas: How To Use Google Analytics To Write Articles
NEW Tutorial: How To Create A Blog Broadcast Newsletter In Aweber
