Lisa Angelettie

Bestselling Amazon Author

  • START HERE
  • BOOKS
  • COURSES
  • RESOURCES
  • HIRE LISA
  • BLOG
You are here: Home / Archives for Working At Home

Check Out My Fiverr Gigs!

April 24, 2014 By Lisa Angelettie Leave a Comment

fiverr gigs

In an effort to introduce my business to a broader audience, I have created six gigs on the popular outsourcing website Fiverr. People will get the opportunity to try some of my services at rock bottom prices and of course the hope is that they will return to me again for more work and for my more sophisticated services, which are at a higher price point.

Fiverr is also a great place to test out a new service that you may be considering and want to “tweak” before you offer it to your tribe. This is another reason why I am doing this as well.

Right now, I am testing six services that I have done with VIP clients only but am looking for a way to offer them at a more affordable price point for a larger demographic. Here are the services that I’m offering, all at the famous Fiverr $5 price:

1. Transcription of 10 minutes of audio or video

2. Transcription of 12 pages of  notes (handwritten or typed)

3. Tweeting a promotion to all 15,000+ of my Twitter followers

4. Professionally analyze someone’s blog (content + seo)

5. Proofread one blog post in 24 hours

6. Proofread and edit any document up to 1200 words

You can take a look at all of my gigs here: http://www.fiverr.com/writergirl

Buying On Fiverr

If you’ve never purchased a product or service on Fiverr, you won’t believe what your missing! You may think that for $5 bucks you’re going to get junk, but that is not always the case. Typically what you’re paying for is a “taste” of the service the seller provides and you have to pay for more “gigs” to get the full kahuna. I’ve made several purchases from Fiverr over the years and honestly I wasn’t disappointed by much. Just remember that if it sounds too good to be true, it probably is. Select your gigs carefully.

Filed Under: Working At Home, Writing Tagged With: Fiverr, outsourcing

The Only Password Software I’ll Use

March 13, 2014 By Lisa Angelettie Leave a Comment

password softwareIf you don’t use password software on  your computer, phone, or tablet — I think you must have a super power! I mean how do you remember every single password that you use on all the sites you visit? Ex: Facebook, Twitter, Amazon, WordPress, Gmail, Paypal, The Bank, etc. Almost every site you visit requires you to sign up or “gently bribes” you to sign up on their website and that’s a lot of passwords to manage.

Before password management software, I’ll admit that I was guilty of creating two or three passwords and rotating them on all the sites I joined. That is a HUGE security risk. (You’re not doing that right?) It would only take a 15 year old hacker about ten minutes to figure out my passwords and when he did he would have access to my entire world. My husband’s Facebook, Twitter, Gmail and Paypal accounts have been hacked twice. It was a pain in the @##! to rectify.

You need password software if you:

1. Shop online
2. Pay bills online
3. Want to safely digitally store important content such as: SS numbers, tax numbers, drivers license numbers, wifi passwords, email passwords
4. Sign up for a lot of online newsletters
5. Participate in social media (Facebook, Twitter, Instagram, Pinterest, LinkedIn, etc.)
6. If you are a local/national entrepreneur with brand recognition online and/or beyond. Hackers prey on people like this. That’s why my husband is targeted so much.

That’s why years ago I signed up for password management software 1Password. At the time I think it was only for Macs and it was powerful and it was great and I’ve been using it for years until I came across a new software called Dashlane. Now I’m usually the type of person who is like “If it ain’t broke, don’t fix it”, and I didn’t necessarily have any problems with my old software but what I learned about Dashlane made me at least do some research around it. What I discovered was:

1. It’s super strong and safe. If you don’t remember your master password to unlock your account, the company can’t give it to you. You’ll be stuck like chuck.

2. There is a free and premium version and the free version is extremely powerful. You could definitely just use the free version and be fine. I paid a lot of money for my old software and I had to pay for a recent upgrade.

3. It integrates with all major browsers so I can log into all my websites seamlessly and pay when I’m shopping online with just a few clicks of my mouse.

4. You can use dashlane on your phone or tablet via their App. I love that I can use it on all my devices. It’s super user friendly.

5. It generates really strong passwords for you, remembers them, and automatically logs you into your sites with them. This is great when you need to generate strong passwords on a regular basis for things like your bank’s website, credit monitoring websites, etc. *Remember that those passwords should change often.

6. If you are currently using a password software, Dashlane can seamlessly import all your information, which was sweet! I just downloaded my info from 1Password and imported it into Dashlane and in less than 5 minutes I was up and ready to rock. They provide you with directions on how to import your info from most major password software products on the market. So it’s very easy.

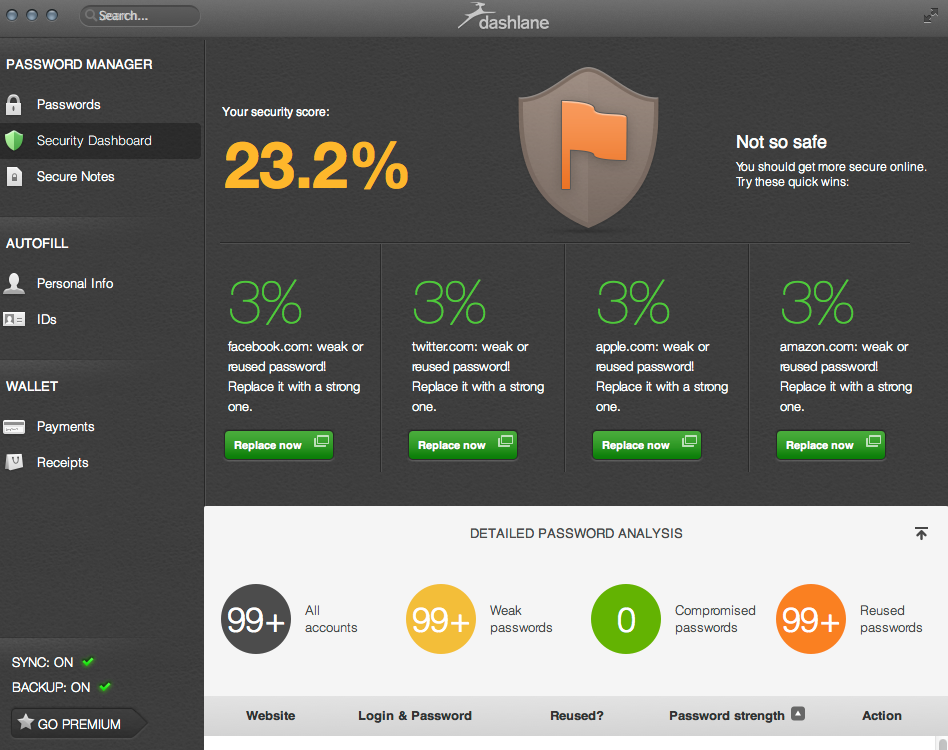
7. A really cool feature on Dashlane is it’s security dashboard. It will tell you if the passwords you are using are strong enough and will give you recommendations on what sites you need to change them for.

dashlane dashboard


Cool right? If you’re ready to tighten up your online security, then you’re ready for Dashlane. Let me know how it works out for you. If you have any questions about it, feel free to add them in the comment section below. I should answer within a few hours.

Filed Under: Reviews, Tech, Working At Home Tagged With: Dashlane, Password Management, password software

Writing Resources For The Disabled Writer

October 13, 2013 By Lisa Angelettie 2 Comments

disabled writer resourcesI take for granted that I can wake up, sit in my office chair, and write/type all day long if I want. No restrictions. Nothing is hindering me. I’m physically capable of doing it, but there are many people who have a physical disability that restricts their ability to write with ease on a daily basis. For example, I have a friend who has multiple sclerosis and no matter how many times she tells me, it doesn’t totally seem to register to me that some days she just can’t get a lot of writing done in her business because sitting at a computer for long periods of time is just too physically painful.

Yet writing is the ultimate freedom for someone who may be restricted in some way physically, and so as a writer, I am very much committed to promoting the career of writing as a viable income source for people who are unable to work traditional jobs outside the home on a regular basis due to their disability. I hope that this list of resources that I’m sharing today will help support those that choose to do so.

*Please note that this list was originally compiled by novelist Lynn Viehl of PaperBack Writer. She is a self-described “handicapped writer”. You can support her by purchasing one of her books. Thank you Lynn.

Resources

Click-N-Type Virtual Keyboard

CNT keyboard customizer (to customize Click-N-Type keyboard)

Cyber Buddy text-to-speech freeware

Dot-to-Dot MacIntosh Braille Editor

EZMagnifier screen magnifier freeware

Java Accessibility Helper (aids developers in making their JFC-based programs accessible to users with disabilities.)

MouseCam screen magnifier

Natural Reader text-to-speech freeware

Philing.net’s free braille and deaf language fonts

Point-N-Click virtual mouse (designed to be compatible with Click-N-Type keyboard)

Rapid Keys Intelligent Virtual Keyboard

Additional Resources:

Grants for Disabled Writers

Helpful Products for Blind and Physically Handicapped People

Simtel’s list of 114 programs for the handicapped user

Programs for handicapped users

Do have any other resources that may be useful for a physically disabled writer? Please share them below and I’ll add them to the list.

Filed Under: Working At Home, Writing Tagged With: Disabled writers, Handicapped writers

How To Make Sure You Don’t Lose Your Gmail Readers

August 12, 2013 By Lisa Angelettie 2 Comments

gmail tabs

Many Of Your Readers Use Gmail…Don’t Lose ‘Em!

Gmail recently introduced new tabs to help organize your inbox. Here’s a quick tip to make sure your readers don’t miss your latest and greatest emails…

1. Send an email or write a blog post to your list showing them what to do so that they don’t miss an email from you (sort of like this post:)

2. Most likely your emails are ending up in readers “promotions” tab. So tell them to GO to the promotions tab, then drag and drop your email into the primary tab.

gmail tab instructions


3. Then instruct readers to click YES when prompted to ensure they receive all of your future emails.

primary-emails


After readers make these quick and easy changes, they’ll never miss an email from you again:)


Filed Under: Ezines, Information Marketing, Working At Home Tagged With: Deliverability, Email Marketing, Email Newsletters, Gmail

How To Market Your Writing Services Online

February 11, 2013 By Lisa Angelettie Leave a Comment

This is a guest post by Steve Aedy.

how to market writing services

Anyone who has spent time in the business world is familiar with the concept of building brand awareness. As a writer, you have probably never given this idea much thought – but you should.

You – and the writing services you provide – are a brand. And, to be successful, you need to build awareness for what you do.

It may seem strange to market yourself. However, if you think of your writing as a service, it seems less awkward to promote what you do.

As is the case with just about every other task you could imagine, the internet can help. Here are eight ways to market your writing services online and build brand awareness.

1. Create a website.

A lot of times, your website is the first point of contact for prospective clients, agents, magazine editors, publishers and more. They will look at your site before they do anything else.

This shouldn’t be surprising. Just like a retail store needs to have an attractive window display to lure clients, you need to have a space for the world to view the services you offer.

You don’t need to create anything overly flashy or super elaborate. Simply provide a place were people can learn about what you have done, the services you offer, and how to contact you. If you don’t want to worry about the mechanics of the site’s design, hire a website designer. Otherwise, there are plenty of online services that will walk you through the armature web design process.

Before you build your website, choose a memorable domain name. Believe it or not, some people do converse offline. For these people, you’ll want an address that is easy to bring up in conversation. Consider using your name for the URL. Or, create a name that portrays the services you provide.

2. Add a blog.

Once you have your website up and running, add a blog. Most people dread starting a blog because it is so time consuming. While that is true – blog writing does take time – it is a very effective marketing tool. Plus, you are a writer! Writing a blog should be right up your alley! Additionally, it will be pretty hard to sell yourself to industry people if you aren’t actively writing on a regular basis.

Don’t let a blog dominate your life. If you have time, write once a week. If you don’t, write once a month.

3. Optimize.

Trying to explain search engine optimization is like opening Pandora’s Box. This particular article isn’t about explaining the ever-evolving world of SEO. Instead, we will simply advise you to do some research. Familiarize yourself with the general idea. Even an amateur website can be optimized with just a few simple steps.

4. Submit to ezines.

Ezines are so much more than a web-based version of a printed publication. They are a great marketing tool for reaching a target audience.

Submit to sites like EzineArticles.com. Your article could get picked up by an ezine from anywhere in the world. All it takes is for someone to see what you’ve written and express an interest in seeing more.

Additionally, this is a great way to boost your SEO efforts. Link back to your website to increase awareness.

5. Comment on other blogs.

Find top quality blogs in the niche you are interested in. Comment on blog posts. This will draw the attention of other readers who might be interested in hearing more of what you have to say. Including a link in your comment will drive even more traffic to your site.

6. Send InMail messages.

Join LinkedIn at a paid level. When you do, you can send InMail to prospects. This is a great proactive approach; you can go looking for prospects instead of waiting for them to come to you. Recent reports have found that 30% of InMail messages get a reply. That means nearly half of your marketing attempts will be fruitful.

7. Use Twitter to research prospects.

Do a keyword search on Twitter. For example, search for a publication name you’re targeting. Once you have found potential prospects, follow them. Often times, that person will check you out and maybe even follow you.

At the very least, you can use this time to research the prospective lead. Get to know them. Find out what they are about. Then, when you send a direct mail, you’ll have a better idea of how to appeal to their needs.

Also, send out random tweets about what you hope to accomplish. For example, tweet something like, “I’m looking to connect with more business magazine publishers.”

8. Create a Facebook fan page.

Create a Facebook fan page for your blog or yourself as a writer. Use contests, polls, and other methods to engage visitors and increase awareness.

The internet is an ever-changing world. What is popular one day might be obsolete the next. The biggest thing to remember when it comes to online marketing is this: don’t ignore opportunities when they present themselves. Don’t be afraid to think outside the box and try something new. Look for creative ways to build brand awareness and generate business leads.

This article was written by Steve Aedy. He is an in-house content writer for FreshEssays.com, a company that provides custom paper writing services and help with editing for college and university students. You can reach Steve at twitter and google+.

Filed Under: Content Marketing, Guest Articles, New Writers, Working At Home Tagged With: Marketing For Writers

The Beginner’s Guide To Creating An Online Newsletter Step By Step

November 11, 2012 By Lisa Angelettie 24 Comments

Want To Create An Online Newsletter That Rocks? It Will Be The Best Thing You’ve Ever Done For Your Business. Welcome To The Beginner’s Guide To Creating An Online Newsletter That Converts Visitors Into Fans!

create an online newsletter

Image Credit: Charis Tsevis

As a content marketer one of the things that I love to do is to create niche websites in areas of interest to me. I have sites and ebooks in several niche spaces, but one of my first niches when I started online was the relationship and dating niche. Already a saturated niche, I took a different spin on it from a psychological standpoint since I had the background as a psychotherapist and did very well with my sites. Recently, I took a major hit in the search engines for several of those sites and my traffic stats dropped significantly. I could spend a lot of time ranting about why some of my sites took hits and others didn’t when I used the same content marketing and SEO principles for all of them, but that’s for another post:)

What I wanted to talk to you about today is the fact that my business was able to survive the search engine hit, because I still had my very responsive email subscriber list. That is what all those internet marketers are talking about when they say that the “money is in the list”. No matter what happens to the traffic to my sites, I can always go back to my list and promote something, share something, ask them something and I will always get a response — including a sale.

So if you’ve been thinking about starting your own online newsletter but weren’t sure about all the details, then I’m going to walk you through them today lickety-split, so that you are up and running in the next 30 minutes. It’s crucial to the survival of any online business.

STEP 1 – What Is An Online Newsletter?

Creating an online newsletter, email newsletter, digital newsletter is all the same. In essence you are writing a newsletter and sharing it digitally with whoever requests to read it on a regular basis. Do you need a newsletter if you have an RSS feed for your blog? The answer is yes. An RSS feed will announce to your readers every time a blog post is published on your site, but a newsletter permits you to send more customized and personal messages to your list at any given time. It also gives you the unique opportunity to allow your personality shine through your copy.

The first purpose of your newsletter first and foremost needs to be to inform, educate and entertain your readers. If you do not publish anything worth reading, or only send promotion after promotion, then you are missing the point and your newsletter will fail.

The second purpose of your newsletter is to establish a relationship between you and your readers. This is what trust-based marketing is all about. My subscribers depend on my newsletter to deliver them a certain level of quality information on a regular basis. Irregular contact will mean that people may forget who you are and unsubscribe from your list or even identify you as a spammer.

The third purpose of your newsletter is to convert readers into clicks, customers, or clients. The only way to achieve this though is to make sure that your fulfilling the first two purposes of newsletter publishing.

STEP 2 – Sign Up For Aweber

You might be tempted to send your emails through your email client (Outlook or Apple Mail) because it’s free, but that would be a big mistake — many of your emails will never make it through the robust spam filters of most servers and your email client will not be able to handle sending emails out as your list grows in size.

That’s why I highly recommend starting your newsletter list off right from the start with industry leader Aweber. They are always improving their tools, the customer service is top-notch, and they have tremendous features all at an affordable price. I know because I’ve used several other companies before finally making my “last” switch to them several years ago. I have been happy every since.

STEP 3 – Create Your First List

You can make as many lists as you like in Aweber. I have lists for several different sites and niches. It’s very easy to do this. So after you’ve registered and signed in, the next step you’ll make is to click on “create and manage lists”.  Aweber also walks you through this process as well with their list wizard at the bottom of your screen.

STEP 4 – Complete Your Basic Settings

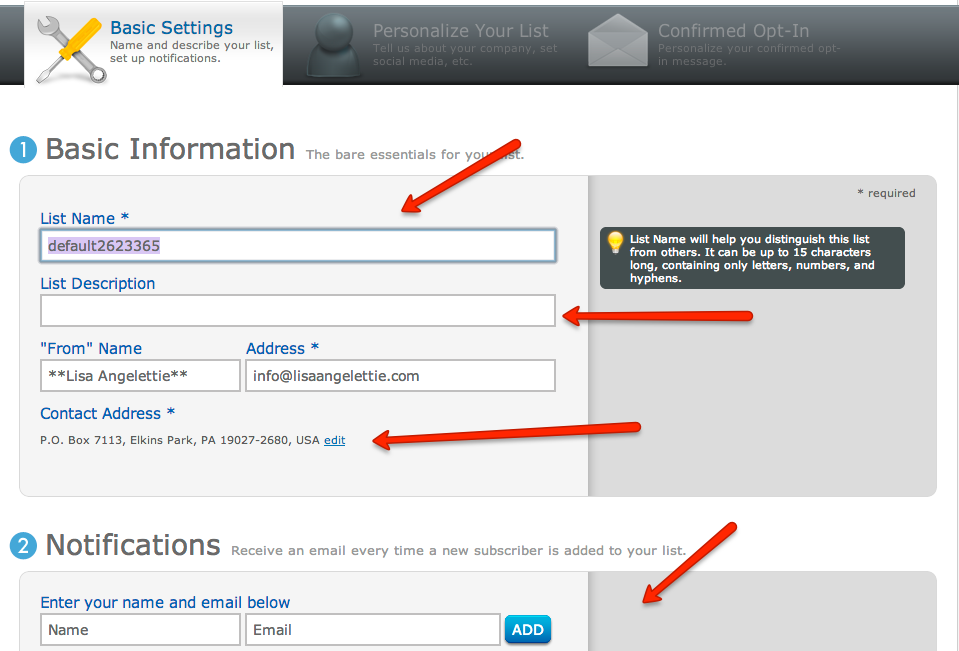
Here is where you fill out the name of your list (for your eyes only), list description (will be seen by people on unsubscribe page), contact information that subscribers will see in the “from” section of their emails, and a notification email address (this is where aweber sends you notifications that you have a new subscriber).

aweber online newsletter

STEP 5 – Personalize Your List

This is where you can add a little personal touch to your list with your company name, logo, url, and email signature. Readers will see this in various places. This section is where you also set up your list to integrate with social media sites Twitter and Facebook. A feature you’ll love!

STEP 6 – Set Up Confirmed Opt-in Email

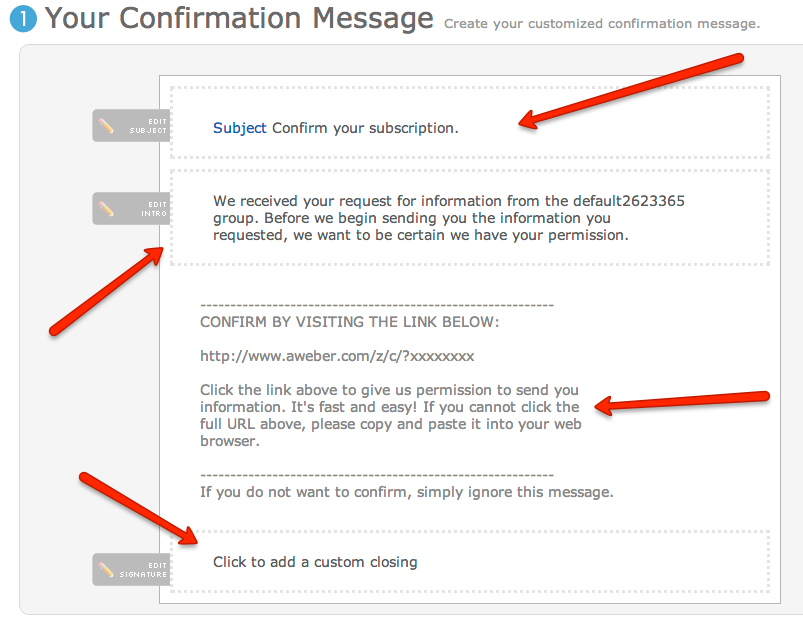
When someone subscribes to your list, Aweber will send them an email asking them to “confirm” that they requested to be put on your list. The reader then has to click on the link in the email to confirm. This is called a double opt-in process and it is the system that most reputable companies strongly encourage us to use in order to avoid problems with spamming.

So Aweber gives you the ability to customize this first “confirmation email” which is really important because some people won’t even remember that they initially requested information from you. It’s up to you to remind them. You can and should edit the subject, intro and signature areas of your email. Aweber gives examples of subject lines you can use and honestly you don’t have to do much editing. Just make sure to change the “list name” info in the intro section to the full name of your newsletter. Don’t keep the list name in the intro section that you used when you created the list.

aweber confirmation

Lastly, you have the option of sending the subscriber to a customized thank you page AFTER they’ve confirmed or you can leave it blank and use Aweber’s standard thank you page. I use a customized page made very easily by creating a page on my WordPress blog. Details you can include in this page are: thanking the reader for subscribing, whitelist information, or a link to download your free offer or promotion. This is the page I use where confirmed subscribers can download my free ebook guide: Make An Ebook Tonight.

aweber confirm url

STEP 7 – Understanding Messages

There are three types of messages you can make in Aweber: follow-up, broadcast, blog broadcast. The type of message you will be creating FIRST is a follow-up a.k.a. autoresponder message. This email will be sent immediately after the reader confirms their subscription by default, so here’s your chance to make a good 1st impression. In my follow up email I typically give the reader a second opportunity to download their free guide. You could also write an email detailing WHY the reader should stay on your list and what they can expect from you and your newsletter. Make sure to also include whitelisting information (your newsletter’s email address), contact information, and any other good business practices you can think of.

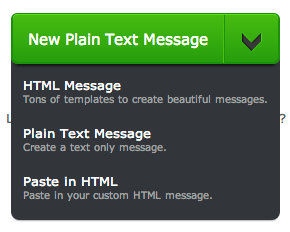
create aweber message

When you go to create your first message, you will see that you have the option of creating a plain text message, an html message (allows you to use fonts, pics, etc.), using one of Aweber’s templates, or an html message using your own custom html. Lots of options! (I will write more about how to use these various message formats in future articles and be sure to link them to this tutorial.)

To make things super simple today, I would make your first follow-up message in plain text format. Plain text has the highest deliverability rate. The biggest thing to remember is that you cannot use link text in plain emails, you have to use full urls ex. http://abc.com in order for them to be live working links.

Write your message within the margins that Aweber recommends so that your emails do not spread too widely in the reader’s email. SAVE your email.

STEP 8 – Test Your Email

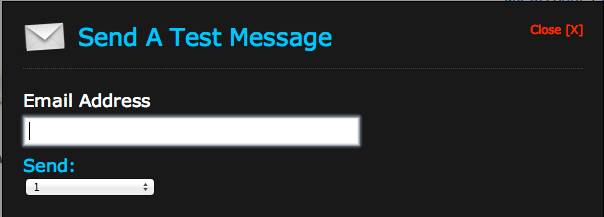
Aweber allows you to send yourself a test email so that you check exactly what your email is going to look like when you send it out. I do this before every weekly newsletter that I send out. You can do it right now to test your FIRST follow up message.

aweber test email

STEP 9 – Create Your Web Form

So how do you get people onto your newsletter list? This would be the perfect scenario: people search for a topic, find it on your website, read your article, then subscribe to your newsletter via web form to get to receive more of your information. In order for that to occur, you need a working web form that captures readers email addresses.

  • You only have to capture an email address on a web form for it work.
  • Email only forms typically convert higher.
  • I like to send more personalized emails though, so I ask for first name and an email address on my web forms.
  • You can create as many web forms as you like per list.
  • Aweber provides analytics so that you can see what forms convert better than others

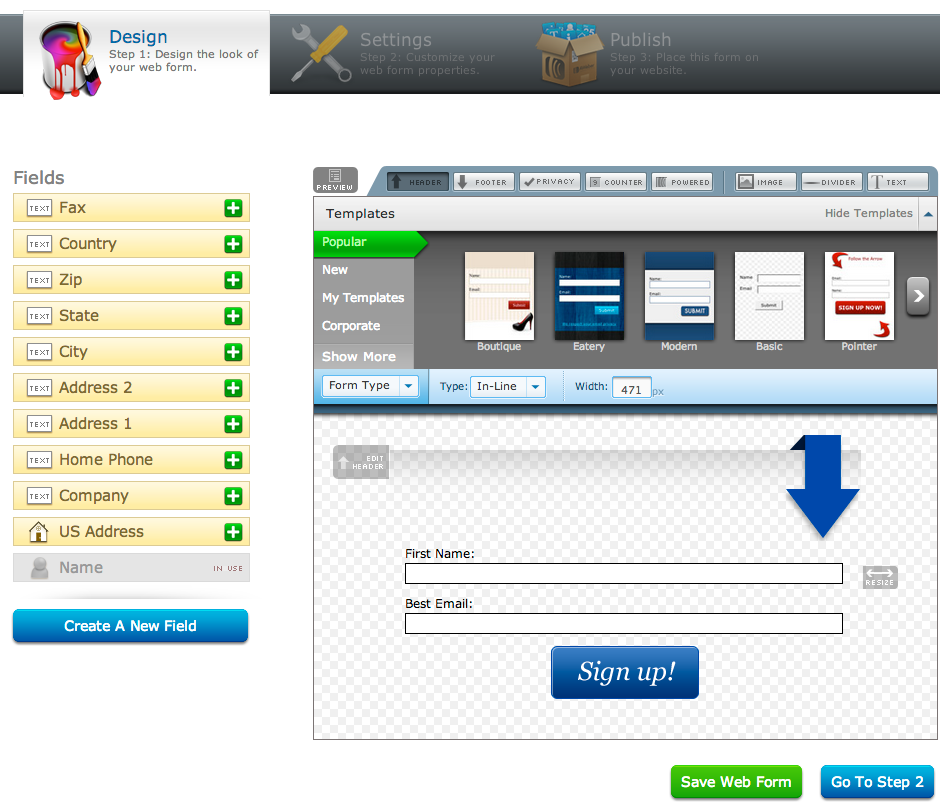
Select Your Template

Choose the design of your web form from the many options that Aweber offers. You can make a few edits to the web form such as adding your own headers and footers, changing the width of the form, including privacy policy info box, and editing the call to action button. Save. Hint: Adding a compelling call to action in the header of your opt-in box will improve conversions. Don’t just ask the reader to “join our list”. That’s borrrring:)

aweber web form settings

Basic Form Settings

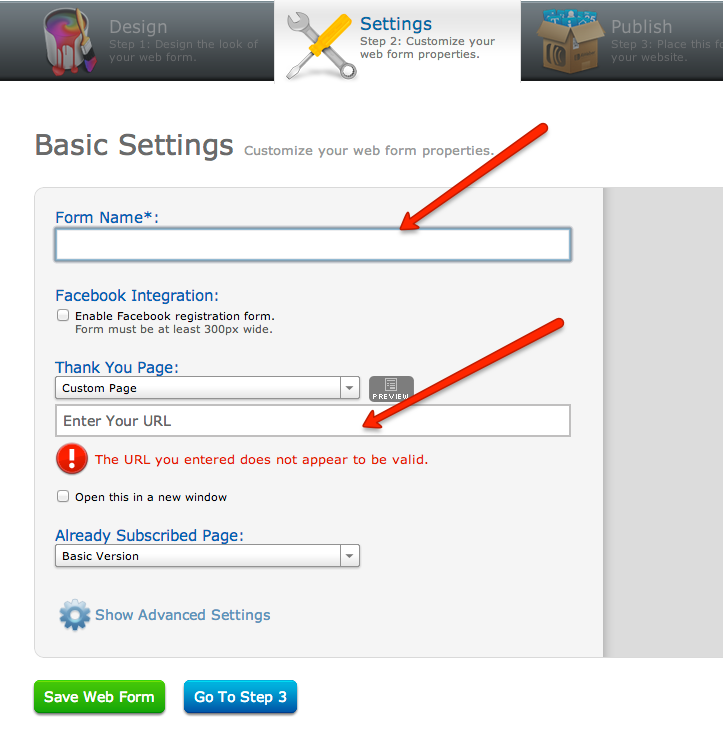
Customize your form’s settings by giving it a name (for you only), adding a custom thank you page url or selecting to use one of Awebers (The thank you page is where subscribers go when they first opt-in. They haven’t confirmed yet), and any already subscribed page you may want to include. Including customized pages in this area is totally optional and you will be fine just using Aweber’s standard forms. They have a text, audio, and video version that you can use that work really well. I choose to use a customized version for branding purposes and to give the subscriber something to do next, but that is an advanced strategy that you can save for later. Save.

web form settings

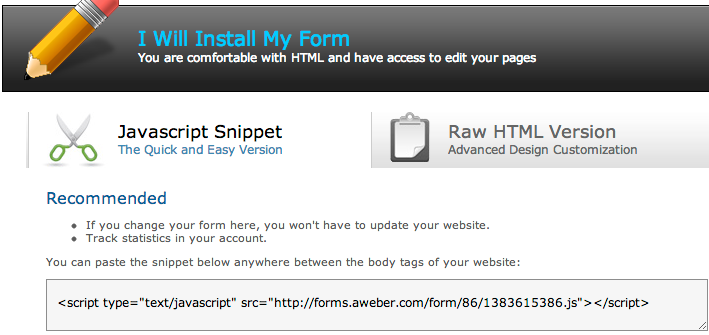
Grab Your Code

Now you are ready to publish your web form on your blog. The best position for your first web form is in the right hand corner or top of the right hand sidebar of your site. Statistics prove that this is where the eye travels first when a visitor visits your site. You can copy and paste the html code that Aweber gives you directly to any website or easily insert your web form into your WordPress blog using Aweber’s handy WordPress plugin.
aweber web code

STEP 10 – Publishing Schedule

Now that you have all the basics in place you are ready to make a big decision. Some entrepreneurs will send you a irregular “rant” and call that a newsletter. It is not. Some people will send you emails periodically about random topics and many of them will be promotional in nature — that’s not a newsletter. In my opinion, a newsletter is information sent to educate, inform, entertain and build a relationship with your reader on a REGULAR basis. That means weekly, bi-weekly, or monthly.

When you do this you will build FANS who not only invest in you but will spread the word about your message. When I surveyed my list, over 23% of them said that they heard about me from a word of mouth referral. Honestly, I attribute that to the fact that I stay in my readers inboxes every week.

Thank you very much for reading this tutorial today.

If after reading this and implementing you are stuck on article ideas for your newsletter, then please read on for additional information on generating article ideas. If you’d like me to do all the work for you, then take a second to look at my Editorial Calendar service.

Also, if you’d like to learn more about my own newsletter feel free to subscribe using the form below and when you do you will get a copy of my ebook writing and publishing guide: Make An Ebook Tonight as a free gift. Thanks again:)

Additional Reading:

  • Writing Articles: Help For When You Run Out Of Things To Write
  • Article Ideas: #1 Thing Your Prospects Want To Read
  • Article Ideas: How To Use Google Analytics To Write Articles

NEW Tutorial: How To Create A Blog Broadcast Newsletter In Aweber

Filed Under: Content Marketing, Ezines, Working At Home Tagged With: aweber, Email Newsletters, Ezine Publishing

How To Build A SEO Friendly Blog In 15 Minutes (Or Less)

October 22, 2012 By Lisa Angelettie 18 Comments

Are You Ready To Learn How To Build A SEO Friendly Blog In 15 Minutes (Or Less) And Write Your First Blog Post? Then I’m Here To Guide You One Step At A Time…

As an entrepreneur one of the most critical pieces of your success online will be building a website that has long-term success in the search engines. Consider what happens when someone searches for a solution to a specific problem online. They type in a few keywords in a search box and waits to see what results are returned. When they see what looks to be like content that will solve their problem (usually in the first 5 results they see), they click the link and go read the content. That is what is called highly qualified organic traffic. Many small business owners believe that getting good rankings involves some sort of complicated series of SEO steps, but trust me when I tell you that in today’s post Panda/Penguin world, it isn’t that difficult. You just need to know what to do and when you do you can get it done rather quickly.

In this post today (this is a long article but worth the read:), I have outlined the steps that you can take to create a really SEO friendly blog as well as write your first post and you can do it all in under fifteen minutes.

STEP 1 – Selecting A Good Great Domain Name

It use to be that SEO experts and marketers taught clients that it’s better if you pick a domain name that has your top keyword phrase in it. We did so because for years that’s what Google showed us and told us they liked. Domain names with keywords in them because it showed relevancy. Yet with recent updates affecting exact domain names as well as Google’s Panda and Penguin updates, now everything we know has been turned upside down.

So the advice now is to not go with a domain name with an EXACT match to your keyword phrase; but to purchase one with your keyword inside. So for example, if you sell blue shoes on your site, do not buy a domain name such as Blueshoes.com — what you could buy though instead is LisasBlueShoes.com or PhiladelphiaBlueShoes.com which is not an exact keyword match but still contains the relevant keyword of blue shoes.

You can also go with a brand name  (such as LisaAngelettie.com) and forget about selecting a keyword rich domain name, yet focus your SEO optimization in other ways, which we will go over in step four of this tutorial.

TIP: You will buy a domain name once and renew it annually with any company you buy it from. Most companies charge between $10 to 15 dollars per name and the same for renewals. It is best to buy a .com name as it is the most widely recognized and used. In a pinch, you could go with a .net or a .org. Do not waste your money on a .info name or a .biz. I have yet to see these do well in the search engines.

RESOURCE: Whichever type of name you decide on, using this link you can purchase one for only $5.99 with my preferred domain hosting company GoDaddy.

godaddy domain names

STEP 2 – Fast & Reliable Website Hosting

Many moons ago, I once founded and ran an article directory for coaches. It was really becoming a great niche resource in my industry until I started running into major problems with my website hosting company. They were constantly shutting me down because of the amount of resources I was using because my traffic was good, submissions were high, and the platform that the directory was built on used a lot of resources. At the time this host didn’t have any other options for me. Shared web hosting which is fine for most sites, was all they provided and I needed something a little more robust.

I went searching for a new webhost and found Hostgator. Someone recommended them as a host who had experience handling resource heavy sites like my own under a completely affordable shared hosting plan. No need for my own server and the cost of that and they were right. I’ve been with them ever since.

One of the major factors that the search engines have been warning webmasters about for months is that page load time and site speed matters when it comes to ranking our content favorably. If it’s between sites that have near identical content but one site is faster than the other, the faster one will be ranked higher. While there are many factors that affect site speed, one of the major ones is using a webhost that is reliable, secure, and speedy.

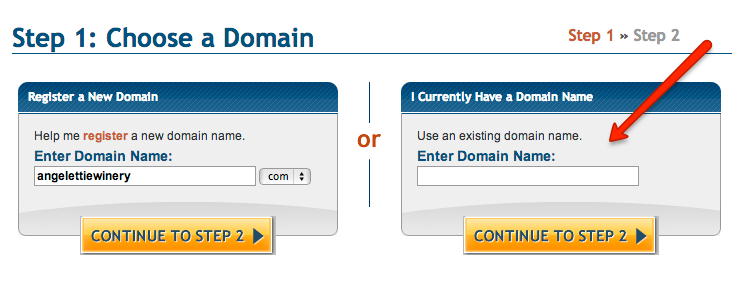
SIDE NOTE: You can also buy your domain name with Hostgator which will cost a little more at $15.00, but I like to keep my domain name registrations separate from my web hosting just in case one of them goes down. If that happens (and I have stories about that!), I can always switch the name to a new host or move a new name to my hosted site. If you purchase your domain name with a separate company such as GoDaddy, then you will need to create your new account using your existing domain name.

existing domain name

TIP: You will need a web hosting company to host your blog. Think of it as “office space” for your blog. Free WordPress hosting will not work for a for-profit company because of their terms of service which they fully execute. You will pay for your web hosting on a monthly or annual basis and packages are rock bottom cheap now (not like when I first started out:). Make sure to write down or record your username and password after you open your account and keep it in a safe place. I use 1password for my password management.

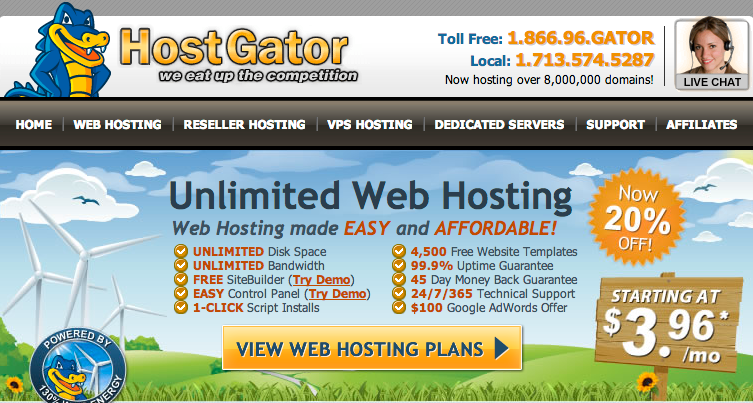
RESOURCE: You can get started with Hostgator webhosting for as little as $3 bucks a month (at the time of this writing) and you can save $9.94 on your entire package only when you use my affiliate link and special coupon code: CONTENTRICH

hostgator webhosting


STEP 3 – Installing WordPress

Once you’ve purchased your web hosting plan, it’s super simple to install your own self hosted WordPress blog. First, you’re going to log into your new web hosting’s account CPANEL area. So for instance, you’d go to the url: http://YourWebsite.com/cpanel, which will lead you to a login box. Add the USERNAME and PASSWORD you used when you created your web hosting account. (I told you to write it down earlier:)

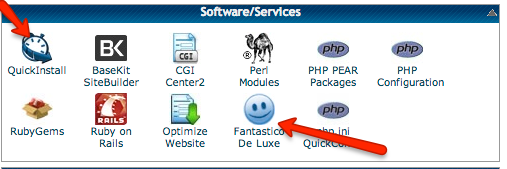
Now you are logged into your cpanel administration area. You can and you should spend a little time playing around in your cpanel area at a later date and get familiar with it. For now, I’m going to have you scroll down and find the links for QuickInstall or Fantastico De Luxe under software/services.  This is the program that you are going to use to install your blog. If you see QuickInstall, go with that one.

wordpress install

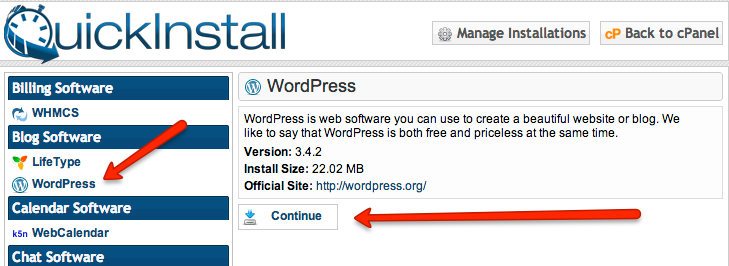
Once you’ve clicked on QuickInstall, then you will look to the list of software programs on the left and click on WORDPRESS. You’ll see information to the right describing the version and installation size of WordPress and a button to click to continue installing the software.

wordpress installation

Once you click continue, you’ll see another box appear on the right hand side where you will input some required information for your new blog. The first thing you’ll see is a drop down menu with your domain name in it. It’s here where you decide if you want your blog to be hosted at the root meaning http://yoursite.com or on a separate directory such as http://yoursite.com/blog. If you want it hosted on a separate directory, then you’ll have to write the name of it in the box next to the drop down menu. For example: blog. You need to be sort of sure how you want to do this because to change it you would have to uninstall WordPress then start all over again.

Examples of both scenarios would look like this:

Hosted at the root: http://LisaAngelettieBlog.com [You see blog posts on the first page of my site because it’s hosted at the root]

Hosted on a separate directory: http://clickbank.com/blog

wordpress quick install

Add an administration email for your blog, your blog’s title, your first and last name (you can change any of these details later) and click INSTALL NOW. Let the magic happen:) You’ll see a progression bar and after installation you’ll see notification of its completion. Congrats!

STEP 4 – Optimizing WordPress

Now it’s time to login to your new WordPress blog. Now you’ll go to your WordPress admin area by going to the url: http://YourSite.com/wp-admin. Once there you will need to input your username and password. Before we start writing your first post, we need to tweak some things to make your blog super SEO friendly.

There are two shortcuts to optimizing your WordPress blog. You can either use a plugin such as the wildly popular WordPress SEO Plugin, or you can use a premium template to do the job such as Thesis, or a combination of both. (I use a combination.) Whichever solution you choose, these are the basics you’ll start with when setting up your site:

Site Visibility – Make sure that you’ve published your blog to the public. You’ll find the option in the privacy area under SETTINGS in your WordPress dashboard. Believe it or not a lot of people forget or don’t know to do this after setting up their blog.

wordpress privacy settings

With the WordPress SEO plugin and Thesis Template you can set up these other three items:

Titles & Meta – Set your title & meta information for your blog the way you want people to see it in a search.
Permalinks – Change your permalink settings to a more SEO friendly one such as /%postname%/.
Sitemaps – Set up a XML sitemap so that search engines can easily crawl every post and page on your site.

RESOURCES: I highly recommend to invest in the Thesis WordPress Template and to download the FREE WordPress SEO plugin by Yoast.

STEP 5 – Writing Your First Post

Whew! You’ve set up and optimized your blog. Now it’s time to write your first post. WordPress is really simple to use. Go to the POSTS link and click on ADD NEW. Give your post a reader friendly title that includes a relevant keyword. WordPress will automatically use that title as the url for the post, but you can edit the url in case it’s too long. (I do this all the time).

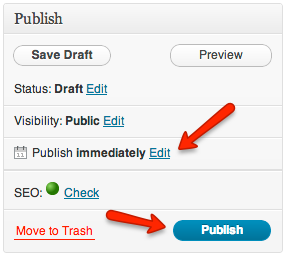
When writing for the first time, sometimes it’s a good idea to write an introductory post which explains who you are and the types of content you’ll be writing about in the future on your blog. Some people just dive in with a really meaty, info-packed post. The choice is yours. Tweak your SEO settings for your post and then publish your post immediately or schedule it to post at a later date.

Thank you for taking the time to read this tutorial. I will be posting a series of supporting mini posts for this tutorial to take your blog publishing and optimization efforts to the next level, so be sure to subscribe to get notification of them or follow me on Facebook, Twitter, or Google+.

Please leave any questions or feedback you have on this tutorial in the comment section and be sure to share this post with someone you think would benefit from it.


Filed Under: Article Blogging, Content Marketing, Working At Home Tagged With: Blogging, SEO, Thesis Wordpress Theme, Wordpress

What Is Distracting You From Building A Profitable Business?

August 9, 2012 By Lisa Angelettie 3 Comments

Are Distractions Driving You Into Business Failure? Well, I Think It’s You’re Inner Ninja Trying To Tell You Something…

business distractions

If you’ve visited my site before, you will see that I offer a lot of how-to training. A lot of tips and resources. I am very much a analytical thinker, but today I want to tap into my “mommy” stuff and my ole’ psychotherapy “hat”. No specific training today, just a dose of reality for all of you in business or thinking about starting a business.

See it’s my job to keep my daughters on track in life. It’s my job to make sure their beds are made, their teeth are brushed, that they’ve showered (very hard in the tween stage by the way!), and that they complete their homework assignments. It’s my job to ensure that they can complete all these tasks with minimal distractions.

But guess what?

There’s no momma to keep you on track if you are an entrepreneur. You’re on your own. So if you are working on or in your business and you find that you are constantly being distracted from what you think you need to do, your inner ninja, inner goddess, or inner voice is trying to tell you something! Trust me.

You may think that you are scattered, unorganized, unmotivated, unproductive and unclear — but you’re subconscious is tapping you on the shoulder and telling you that those things aren’t true. You are fabulous, BUT you aren’t really doing what you should be doing in your business.

First Of All, I believe that every successful and happy entrepreneur owns a business that fulfills two criteria. They are passionate about it and they have the skillset to make it happen. So if you are trying to start a business and have had zero training or experience in what you are doing or you wouldn’t do what you are doing for free for someone, then you are going to have a mighty hard road building that business. Make sure you are always learning and honing your craft and love doing it.

Second, you need to pay attention to what exactly is distracting you. If you find that you are spending a lot of your day on social media rather than writing your blog posts because you enjoy it — that’s telling you something. That’s your inner voice trying to tell you that there is something about social media that is much more enjoyable for you. Something that you can get passionate about. Something that you should perhaps find a way to implement in your business in a more strategic way so that you spend more of your time doing that. Maybe it’s a total change in your business? Maybe you ARE a social media expert?

Perhaps you find yourself doing a lot of the techie things in your business when you feel like you should be doing more in person networking. If you are avoiding networking like the plague, don’t beat yourself up about it. Figure out a way to do more of what you love to do to grow your business. You can’t fit a round peg into a square hole!

Don’t spend months or even years trying to model a business owner you’ve seen create a great business doing things that don’t work for you. It isn’t smart. It isn’t productive. It isn’t authentic. And it won’t work. I spent a LONG time trying to model my business after experts and gurus who I thought had the answer for me, when the answer was inside me all along — writing. That’s what I love to do, I do it for free, I’ve done it in some capacity since I was a small child. I’ve always loved words. It just took me a really long time to realize that. I don’t want that for you.

So the lesson for today? Listen to your gut. If you are distracted a lot of the time. Figure out what you’re doing with your time and turn those lemons into lemonade!

Let the church say Amen!

FREE RESOURCES FOR READING THIS ARTICLE LATER
Save this article and read it later on any device with GetPocket
Convert this article into an Mp3 recording and listen to it on any device with SoundGecko

Filed Under: Marketing Mindset, Working At Home Tagged With: business distractions, home business

  • 1
  • 2
  • 3
  • …
  • 10
  • Next Page »

Search Me!

READ ON KINDLE

MY FAV’ WRITING TOOL

Scrivener

PERSONAL CONSULTING

FREE WORDPRESS PLUGIN

IMPORTANT LINKS

Subscribe To This Blog On Kindle
Wordpress Guest Post Plugin
Testimonials
Newsletter
Terms of Use
Copyright
Privacy
Disclaimer
Contact Me

From The Blog

  • Back Matter 101: How To Add Killer Call To Actions To Your Books
  • Shelfari Is No Longer An Option In Author Central
  • What Are The Most Well-Read Cities In America?
  • Google Play Is Closed To New Publishers
  • Kindle Blog Publishing Is Amazon Bestseller!

CONNECT WITH ME

Twitter
Facebook
Google+
LinkedIn

Copyright © Lisa Angelettie · Powered By Hostgator And A Whole Lotta Love:)